

During our first ever virtual .NEXT conference that took place in September 2020, we had over 1000 Test Drives taken over the course of the two day event. If you’re not familiar, Nutanix Test Drive allows you to experience Nutanix products and solutions on-demand directly in your web browser. These clusters are pre-seeded with interesting services, VMs, and demo applications to make the experience interesting for our end users.
Have you ever wondered how we can reliably create 1000s of Nutanix clusters in a short period of time? And, once created, how we prepare these clusters with interesting VMs, data, and demo applications? The short answer is that we use Nutanix Calm extensively during this process! If you’re not familiar, Nutanix Calm provides infrastructure and application automation and orchestration across private clouds and public clouds. For a longer answer, read on!
Cluster Creation
The first step is creating a nested Nutanix that can run on a wide variety of infrastructure platforms. While nested clusters cannot be used for performance testing, they’re a fantastic option for demo and testing environments, as they run normal Nutanix AOS and AHV software.
Nutanix QA Engineering has been utilizing automated provisioning and testing with nested clusters for over five years. This enables developers to rapidly test software changes with minimal reliance on physical hardware. So when we were looking for a platform to run Nutanix Test Drive, this method was an obvious choice. There’s no need to reinvent the wheel!
Creating nested Nutanix clusters has minimal practical applications for Nutanix customers, so we’re not going to spend much time covering the architecture in this blog post. But at a high level, AHV runs as a virtual machine on the infrastructure provider (which can be Nutanix or any public cloud provider) rather than directly on the bare metal. User VMs then run as nested VMs within the AHV VM, which allows for dozens of virtual Nutanix clusters within a physical Nutanix cluster.
Cluster Preparation
Now that we have a nested cluster created, it’s time to seed the cluster with interesting services, VMs, and demo applications. Otherwise, prospects who want to try out Nutanix would be required to manually create all of these objects. For instance, here’s some of our current Test Drive experiences, services, VMs, and applications which are pre-seeded for our end users:
- Calm: 5 sample blueprints, 5 marketplace items, 3 projects, and 2 running applications
- Karbon: Enable Karbon service, 2 Kubernetes clusters created (1 of which is on older versions so users can perform upgrades) each with workstation VMs for cluster management, and host OS images downloaded
- Era: Deploy the Era server, enable Era multicluster, provision an Era Postgres database, and clone that database multiple times
- Clusters: Deploy an Era server, enable Nutanix Objects, and deploy an on-premises cloud native demo application. End users later burst this application to Nutanix Clusters on AWS and native AWS services.
- Flow: Task Manager application that users will later secure, and multiple client VMs with UIs that they utilize to validate and test the security policies
- Objects: Deploy a Linux management VM, enable Nutanix Objects, and create an Object Store
- Karbon Platform Services: Deploy a multi-node Service Domain, configure the Nutanix CSI driver, and register the Service Domains to the KPS management plane
- Core: Deploy a Linux management VM with a UI and pre-created scripts for end users to execute
Calm creates every single item listed above through a combination of robust APIs, blueprints, and application constructs. For each test drive, an empty cluster is provisioned, and Calm is then utilized to seed the cluster with the relevant data, from Nutanix services to complex applications to basic infrastructure. This means that Calm not only must be robust in the types of data it deploys, but extremely reliable, as any errors would result in broken demos for end users.
If you’re curious on how we make all of this happen, the rest of the blog is going to be focused on diving into the technical aspects of this process. We’re going to use Nutanix Era as an example, however the overall process for all of the experiences is the same:
- Configure the default Calm project
- Upload and configure the various blueprints required by a given experience
- Launch each of the blueprints
All of these actions are completed via Python scripts which utilize Calm’s comprehensive Rest APIs. The blueprints themselves will vary depending on experience, but in many cases these blueprints are already available on Nutanix’s GitHub repository.
Configuring the default Calm Project
Nutanix Calm uses the concept of “projects” to handle role based access control. They allow you to add Active Directory users and groups, associate various cloud accounts, and enforce quotas. In the case of Test Drive, our configuration of the “default” project is pretty straightforward: we’re only using the “admin” user, and we’ll have one or two nested Nutanix clusters (depending on experience) as our cloud accounts.
Since projects are a shared construct between several Prism services, we’ll access the Rest API explorer via the user button in the upper right corner of Prism.
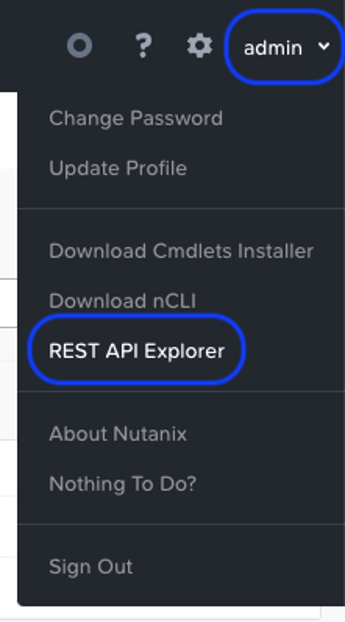
Clicking on the “REST API Explorer” link will open a new browser tab, where you view a variety of Nutanix V3 API endpoints. Before we get to the project's call, we’ll first need to get our “subnet” information to later apply to our default project.
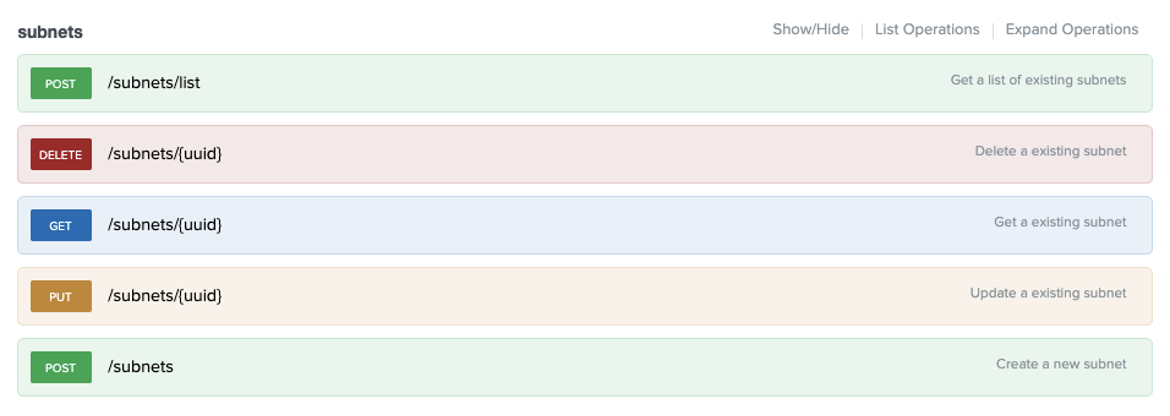
We’ll utilize Python’s Request module to perform an HTTP Post against the “/subnets/list” endpoint in an interactive python shell. First, let’s import the necessary libraries.
michael:~/$ python
Python 3.7.7 (default, Apr 10 2020, 12:22:32)
[Clang 10.0.1 (clang-1001.0.46.4)] on darwin
Type "help", "copyright", "credits" or "license" for more information.
>>> import json
>>> import requests
>>> import os
>>> import base64
Next, we’ll set several variables, the first three will be unique on a per-cluster basis, and the remaining will be consistent for every cluster. We’ll use these variables throughout the rest of the blog to make various API calls.
>>> pc_ip  = "35.203.137.146"
>>> user   = "admin"
>>> passwd = "MySecurePassword123!"
>>> creds  = base64.b64encode((user + ":" + passwd).encode()).decode()
>>> payload = { "length": 100 }
>>> headers = { "Content-Type": "application/json", "Accept": "application/json", "Authorization" : f"Basic {creds}" }
>>> baseurl = "https://" + pc_ip + ":9440/api/nutanix/v3/"
Now we’re ready to start making API calls against our cluster. We’ll first make a “subnets” call to get information from our cluster which we’ll later apply to our project. In this example, the subnet we wish to later apply to our project is titled “default-net-dur.”
>>> s = requests.post(baseurl + "subnets/list", headers=headers, data=json.dumps(payload), verify=False)
>>> subnet_name = "default-net-dur"
>>> for subnet in s.json()["entities"]:
...   if subnet["spec"]["name"] == subnet_name:
...     subnet_uuid = subnet["metadata"]["uuid"]
...
>>> subnet_uuid
'c6185f06-3f8e-4d89-a829-d0356d61cdd0'
To summarize the above commands, we first made an HTTP Post call against our /subnets/list endpoint, and then cycled through the response entities to find our subnet titled “default-net-dur.” Once found, we set our subnet UUID to a variable for later use.
Next, we’ll make an “accounts” call to get our Prism Central UUID and name. A Calm account is essentially an infrastructure provider, like AWS, Azure, vCenter, or in our use case, a Prism Central instance with AHV clusters registered to it. We’ll get our PC information to momentarily attach to our project along with the subnet information we just gathered.
Since accounts are a Calm-only resource, the Rest API explorer is accessed via a new manner. In Prism Central, navigate to ≡ > Services > Calm, and then in the lower left corner click the gray ? icon, and then in the pop-up that appears, click the “Rest API Explorer” link.
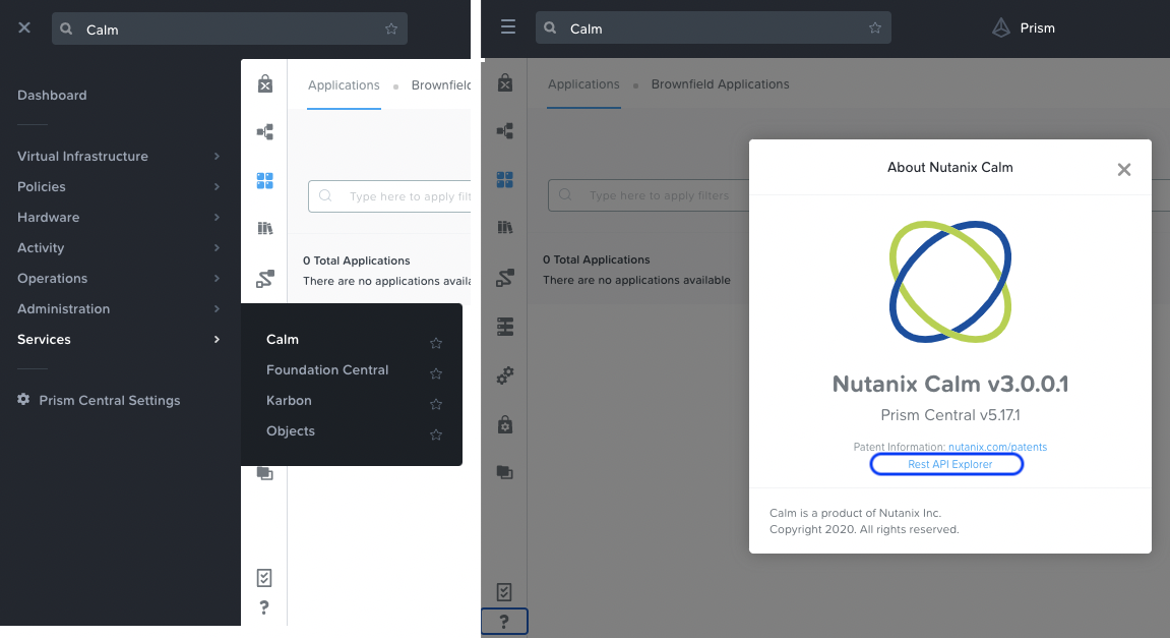
On the page that opens in a new tab in your browser, you’ll notice all of the Calm specific API endpoints like apps, blueprints, and marketplace items. We’ll make use of some of these endpoints in upcoming steps, but for now we’re interested in the “accounts” endpoint.
First we’ll make an “accounts/list” post call, and then we’ll cycle through the responses, looking for the account of type “nutanix_pc.” Once found, we’ll set some variables for later use.
>>> a = requests.post(baseurl + "accounts/list", headers=headers, data=json.dumps(payload), verify=False)
>>> for account in a.json()["entities"]:
...   if account["status"]["resources"]["type"] == "nutanix_pc":
...     account_name = account["metadata"]["name"]
...     account_uuid = account["metadata"]["uuid"]
...
>>> account_name, account_uuid
('NTNX_LOCAL_AZ', '958ca23a-3168-42b4-9590-157588a82e83')
Now that we have our account and subnet information, we’re ready to update our project. You can view the Projects API details in the previous Rest API Explorer page, as “projects” are a shared resource in Prism.
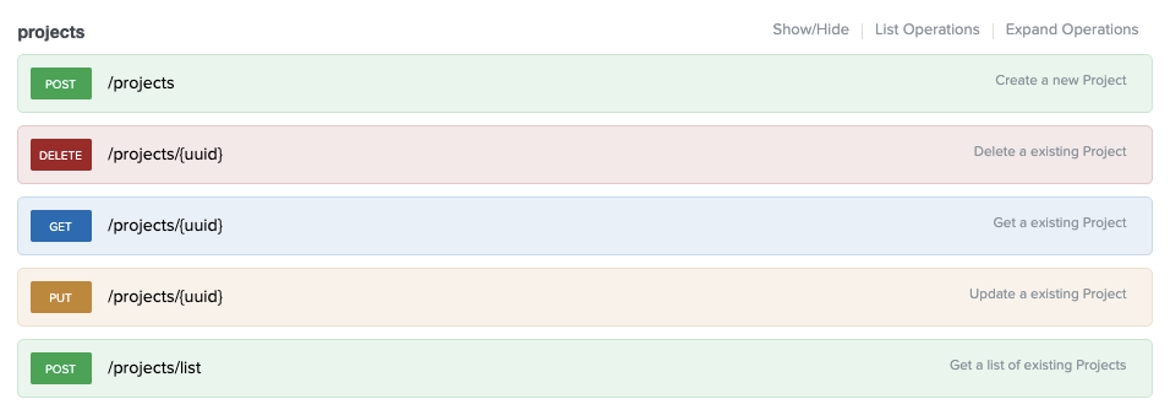
>>> p = requests.post(baseurl + "projects/list", headers=headers, data=json.dumps(payload), verify=False)
>>> for project in p.json()["entities"]:
...   if project["spec"]["name"] == "default":
...     project_uuid = project["metadata"]["uuid"]
...     del project["status"]
...     project["spec"]["resources"]["subnet_reference_list"].append({
...       "kind": "subnet",
...       "name": subnet_name,
...       "uuid": subnet_uuid
...     })
...     project["spec"]["resources"]["account_reference_list"].append({
...       "kind": "account",
...       "name": account_name,
...       "uuid": account_uuid
...     })
...     u = requests.put(baseurl + "projects/" + project["metadata"]["uuid"], headers=headers, data=json.dumps(project), verify=False)
...
To summarize the above steps, we first make a “projects/list” call to grab all of our projects, and then cycle through the response to find the “default” project. Once found, we set a variable to save the project UUID for later use, and then delete the “status” section of the response, as that should not be present when we later update the project. Next, we append our subnet and account information that we previously gathered.
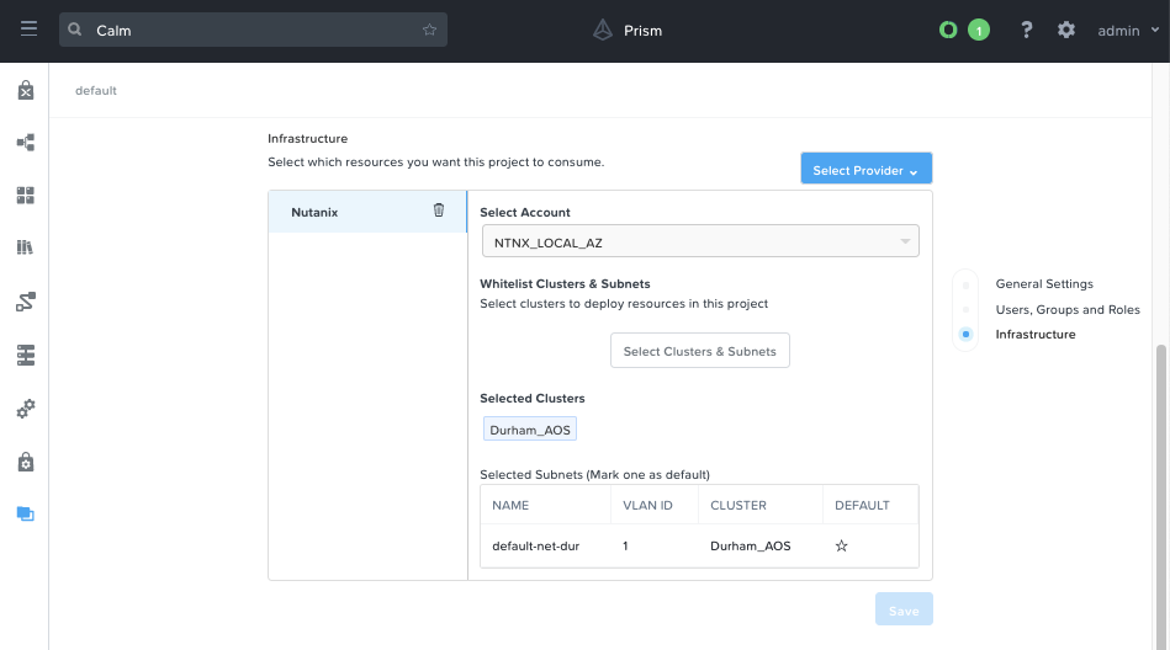
Finally, we perform a “projects” put call to update our project with this new information. If we head over to the Calm UI and view our default project, we now see we have our account and subnet information attached to the project.
Upload and Configure Blueprints
Now that we have our default project configured, we’re ready to upload each of the blueprints required by a given experience. While the total number of blueprints needed to upload varies by experience (anywhere from one to five), we’ll be uploading a single blueprint, as the process is identical for each blueprint.
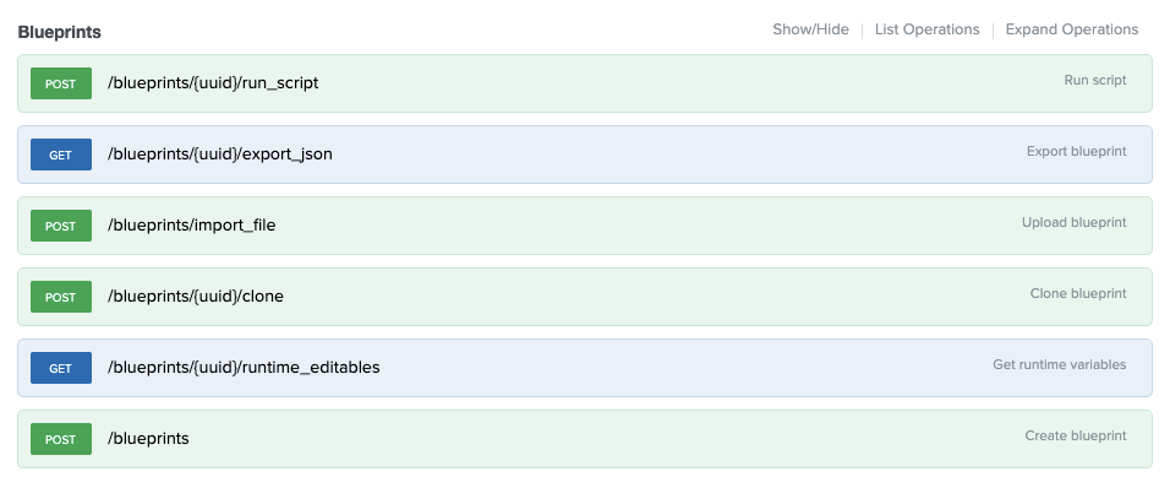
All of the calls made will be under the “blueprints” endpoint, which is in the Calm Rest API Explorer page. There are around 23 different calls for the “blueprints” endpoint, so the below screenshot only contains the first several for brevity.
>>> upload_headers = { "Authorization" : f"Basic {creds}" }
>>> upload_payload = { "name": "EraServerDeployment_Infra", "project_uuid": project_uuid }
>>> files = { "file": open( f"blueprints/EraServerDeployment_Infra.json", "rb" )}
>>> i = requests.post(baseurl + "blueprints/import_file", headers=upload_headers, data=upload_payload, files=files, verify=False)
You’ll likely notice this call looks a bit different from the previous calls, which is due to utilizing a file upload with requests. First, we have new headers that only contain our credentials, and we have a new payload that has information about the blueprint name, and the project UUID (which was set in the previous section) that our blueprint will belong to.
Next, we open our blueprint file that is stored on the OS in our “blueprints” directory, and finally we make the “blueprints/import_file” post API call. If we navigate to the blueprints tab of our Calm UI, we’ll see our newly uploaded blueprint.
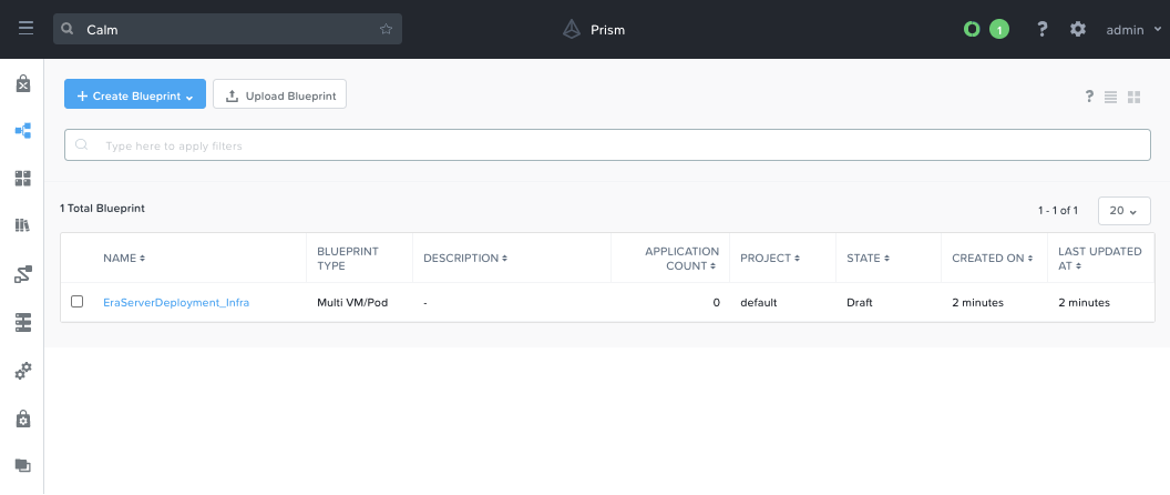
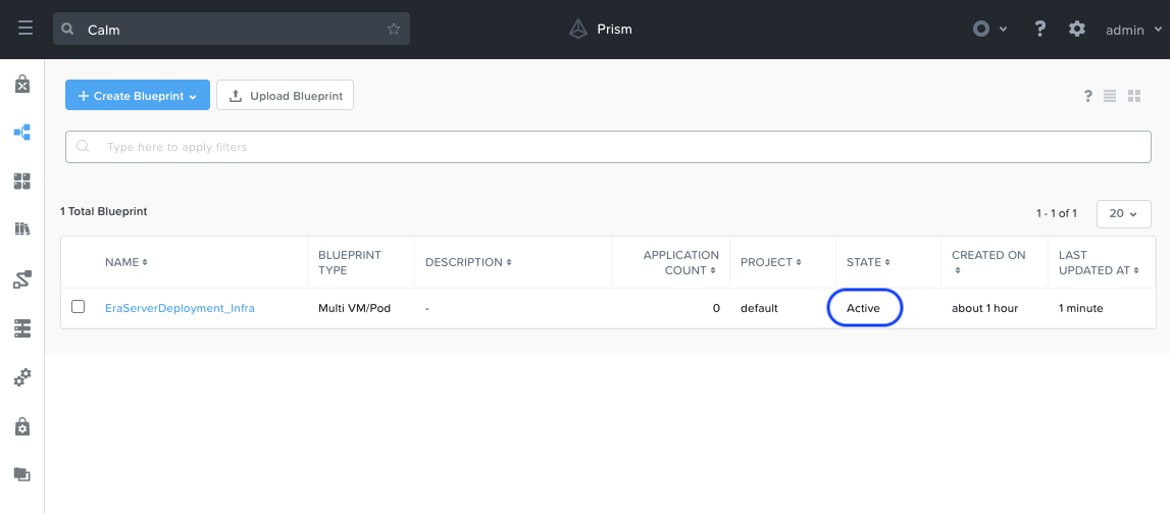
Take note that our blueprint is in a “Draft” state, which means we’re not yet ready to launch it. We must first update the blueprint credentials (as secrets are not stored in the blueprint json by default) and VM networking to get it into an “Active” state.
>>> d = requests.post(baseurl + "blueprints/list", headers=headers, data=json.dumps(payload), verify=False)
>>> for blueprint in d.json()["entities"]:
...   if blueprint["status"]["name"] == "EraServerDeployment_Infra":
...     blueprint_uuid = blueprint["metadata"]["uuid"]
...
>>> blueprint_uuid
'e2a71705-6024-4824-8198-c3d4c56433dc'
>>> b = requests.get(baseurl + "blueprints/" + blueprint_uuid, headers=headers, verify=False)
In the above code, we made a “blueprints/list” post request to get every blueprint in Calm. We then cycled through our blueprints, and found the blueprint named “EraServerDeployment_Infra" to get the blueprint’s UUID. Finally, we made a “blueprints/{uuid}” get request to get the blueprint body, and we’re now ready to configure this blueprint.
>>> bp_body = b.json()
>>> del bp_body["status"]
The first step in configuring the blueprint is to set the previous response equal to a variable, which we can then modify as needed. The “status” portion of the response is not needed, so we’ll first delete that. Next, the two main items of the blueprint we must configure are the secrets and the VM NICs.
>>> EraAdmin = "MySecureEraPassword123!"
>>> PE_Creds = "MySecurePePassword123!"
>>> EraCLI = """-----BEGIN RSA PRIVATE KEY-----
... MIIEowIBAAKCAQEAii7qFDhVadLx5lULAG/ooCUTA/ATSmXbArs+GdHxbUWd/bNG
... < key intentionally omitted >
... gmznERCNf9Kaxl/hlyV5dZBe/2LIK+/jLGNu9EJLoraaCBFshJKF
... -----END RSA PRIVATE KEY-----"""
>>> for secret in bp_body["spec"]["resources"]["credential_definition_list"]:
...   secret["secret"]["attrs"]["is_secret_modified"] = True
...   if secret["name"] == "EraAdmin":
...     secret["secret"]["value"] = EraAdmin
...   elif secret["name"] == "pe_creds":
...     secret["secret"]["value"] = PE_Creds
...   elif secret["name"] == "EraCLI":
...     secret["secret"]["value"] = EraCLI
...
In the above snippet, we first set three credential variables. We then cycle through all of the credentials in the blueprint, modifying two fields. The first is the “is_secret_modified” boolean, which we must set to true to signify that the credentials have been modified. Next, we find the correct secret name, and set its corresponding value to our previously set variable.
>>> for substrate in bp_body["spec"]["resources"]["substrate_definition_list"]:
...   for nic in substrate["create_spec"]["resources"]["nic_list"]:
...     nic["subnet_reference"]["uuid"] = subnet_uuid
...     nic["subnet_reference"]["name"] = subnet_name
...
>>> c = requests.put(baseurl + "blueprints/" + blueprint_uuid, headers=headers, data=json.dumps(bp_body), verify=False)
>>>
For the VM NICs, we cycle through each “substrate” in the blueprint, and set each NIC to our “subnet_uuid” and “subnet_name” fields, which were defined previously during the project update section. We’re then ready to make a put requests call, which updates our blueprint with our secrets and NICs.
If we head back to the UI and refresh the page, we should now see that our blueprint is in an “Active” state. This means our blueprint is now ready to be launched.
Launching Blueprints
If you’ve ever launched a Calm blueprint via the UI, you’ll likely recall that you must choose the appropriate application profile and any needed runtime variables. In API terminology, these items are called “runtime_editables” and can be retrieved by a get request.
>>> r = requests.get(baseurl + "blueprints/" + blueprint_uuid + "/runtime_editables", headers=headers, verify=False)
>>> for profile in r.json()["resources"]:
...   if profile["app_profile_reference"]["name"] == "Default":
...     profile_ref = profile["app_profile_reference"]
...     run_editables = profile["runtime_editables"]
...
>>> profile_ref
{'kind': 'app_profile', 'name': 'Default', 'uuid': 'fee55ca0-db04-4f82-bc07-dfc99e32639a'}
>>> run_editables["variable_list"]
[{'description': '', 'uuid': '0c794612-f2fd-4300-884a-757b40db44f6', 'value': {'value': 'default-net-dur'}, 'context': 'app_profile.Default.variable', 'type': 'LOCAL', 'name': 'db_network_primary'}]
In this blueprint, we’ll be launching the “Default” application profile. So in the above snippet, we cycle through the runtime editables to find the profile named “Default,” and then set two variables. “Profile_ref” represents our “Default” application profile, and “run_editables” represents each field within that application profile which is marked as runtime.
In this particular blueprint, we do not need to modify any of the “run_editables” runtime fields, however this ultimately depends upon your use case. If you need to modify these values simply cycle through the list, find your matching name, and then update the value field.
>>> launch_payload = {
... "spec": {
... "app_name": "EraServer",
... "app_description": "Era Server Application",
... "app_profile_reference": profile_ref,
... "runtime_editables": run_editables,
... }
... }
>>> l = requests.post(baseurl + "blueprints/" + blueprint_uuid + "/simple_launch", headers=headers, data=json.dumps(launch_payload), verify=False)
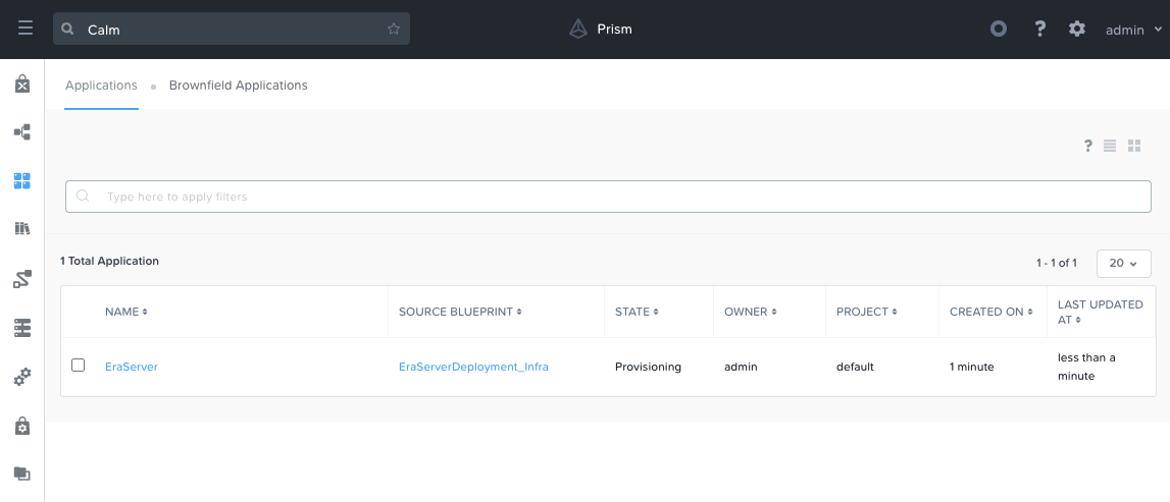
>>> We’re now ready to launch our blueprint, which we can do with a post request. We first must create a “launch_payload” that contains our application name and description, and our previously configured application profile and runtime editables variables. If we head back to our UI, we should see our newly provisioning application.
Conclusion
As you can see, it’s a simple process to utilize Nutanix Calm’s APIs to manage projects, blueprints, and applications. For Nutanix Test Drive, we utilize the above process for a wide variety of blueprints, depending on the Test Drive experience. These blueprints can then be reused throughout Nutanix and customer environments.
Next time you take a Nutanix Test Drive, head into the Calm page of Prism Central to get a behind-the-scenes view of the process of preparing your cluster!
This post was authored by Michael Haigh, Technical Marketing Engineer
© 2020 Nutanix, Inc. All rights reserved. Nutanix, the Nutanix logo and all Nutanix product and service names mentioned herein are registered trademarks or trademarks of Nutanix, Inc. in the United States and other countries. All other brand names mentioned herein are for identification purposes only and may be the trademarks of their respective holder(s). This post may contain links to external websites that are not part of Nutanix.com. Nutanix does not control these sites and disclaims all responsibility for the content or accuracy of any external site.