

Nutanix introduces the Multicloud Snapshot Technology (MST) Disaster Recovery (DR) with Zero Compute Deployment as a cost-effective approach to disaster recovery. This solution leverages AWS S3 buckets or Nutanix Objects for storing snapshots, enabling organizations to replicate data from on-premises clusters to low-cost object storage. In the event of a disaster, an on-demand Nutanix cluster can be deployed in AWS or on-premises for recovery, ensuring minimal downtime and reduced operational costs.
This article focuses on the MST DR with Zero Compute Deployment feature, its benefits, and how to configure it using a limited access policy for an S3 bucket named zerocompute.
Key Features of MST DR with Zero Compute Deployment
-
Cost-Effective Storage:
Snapshots are replicated directly to AWS S3 or Nutanix Objects, eliminating the need for perpetual compute nodes. This reduces the total cost of ownership (TCO) by leveraging low-cost object storage. -
On-Demand Cluster Deployment:
In the event of a disaster, an on-demand Nutanix cluster can be quickly deployed in AWS or on-premises to recover workloads using the replicated snapshots. -
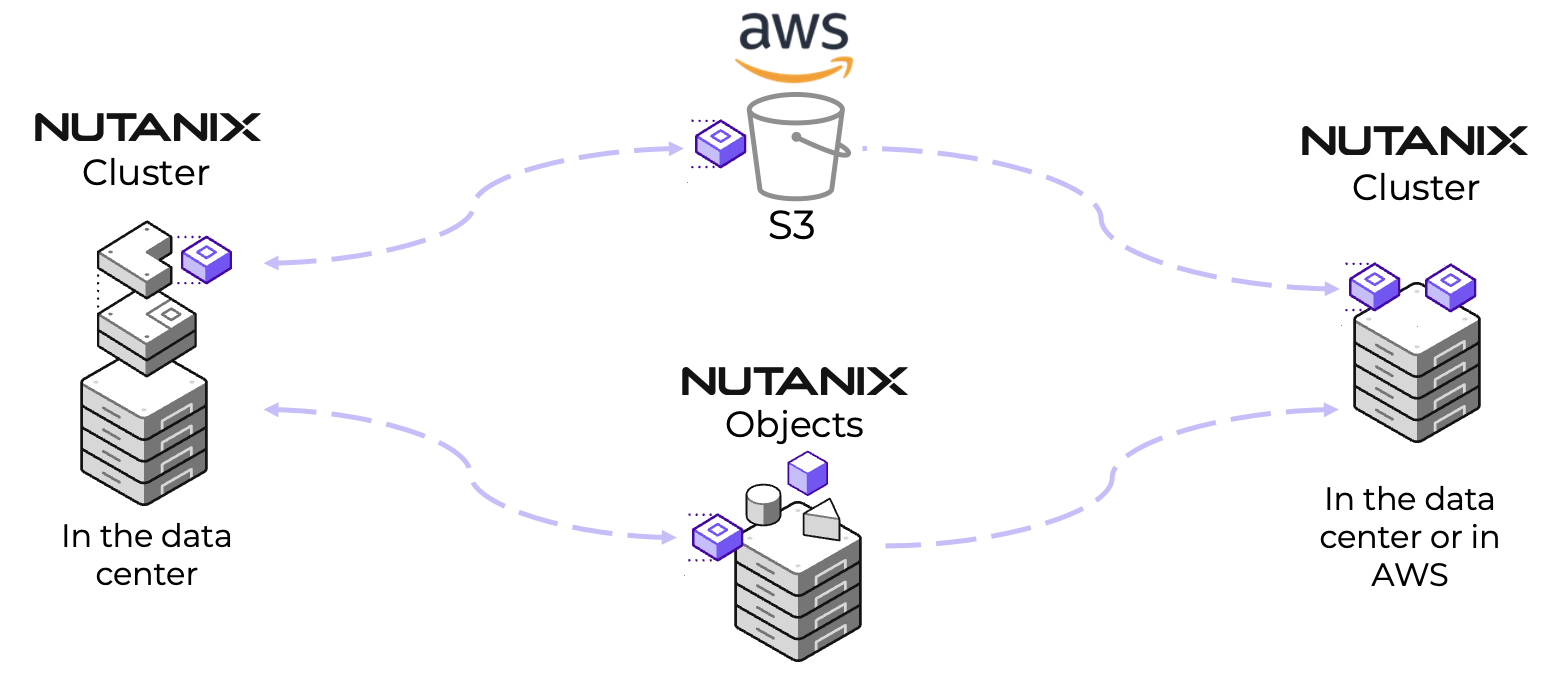
Flexible Recovery Options:
-
On-Premises to AWS S3: Snapshots are stored in S3, and recovery is performed on an NC2 cluster in AWS.
-
On-Premises to Nutanix Objects: Snapshots are stored in Nutanix Objects, and recovery is performed on an on-premises Nutanix cluster
-
Configuring MST DR with Zero Compute Deployment
Step 1: Create an S3 Bucket
Before setting up MST DR, create an S3 bucket named zerocompute in your AWS account.
Step 2: Define Limited Access Policy for S3 Bucket
To ensure secure access to the S3 bucket, define a limited access policy that allows only the necessary actions for Nutanix to interact with the bucket. Below is an example of a limited access policy for the zerocompute bucket:
{
    "Version": "2012-10-17",
    "Statement": [
        {
            "Sid": "VisualEditor0",
            "Effect": "Allow",
            "Action": [
                "s3:PutObject",
                "s3:GetObject",
                "s3:AbortMultipartUpload",
                "s3:ListBucket",
                "s3:DeleteObject",
                "s3:GetBucketLocation"
            ],
            "Resource": [
                "arn:aws:s3:::zerocompute/*",
                "arn:aws:s3:::zerocompute"
            ]
        }
    ]
}
Step 3: Deploy and Register MST Services
Deploy MST services on your on-premises cluster and register the S3 bucket (zerocompute) for snapshot management. Use the following Prism central CLI command to deploy MST:
clustermgmt-cli mst deploy -b zerocompute -r <region_name> -i <IP1,IP2,IP3> -s <subnet_name> -t awsReplace the placeholders with the appropriate values:
-
<region_name>: The AWS region where the S3 bucket is located. -
<IP1,IP2,IP3>: Three static IP addresses for MST deployment. -
<subnet_name>: The subnet name for MST VMs.
Step 4: Create Protection Policies
In the Prism Central UI, create protection policies to protect your VMs or VGs. Specify the zerocompute S3 bucket as the replication target. Ensure that the replication schedule is set to Asynchronous (1-hour RPO or more).
Step 5: Protect VMs or VGs
Apply the protection policy to the VMs or VGs that need to be safeguarded. The snapshots will be replicated to the zerocompute S3 bucket according to the defined schedule.
Step 6: On-Demand Recovery Site Deployment
In the event of a disaster, manually deploy an on-demand Nutanix cluster in AWS or on-premises. Use the snapshots stored in the zerocompute S3 bucket to restore the workload
Full DR documentation => https://portal.nutanix.com/page/documents/details?targetId=Disaster-Recovery-DRaaS-Guide-vpc_2024_3:ecd-ecdr-mst-dr-with-zero-compute-deployment-new-c.html
The MST DR with Zero Compute Deployment feature provides a cost-effective and flexible disaster recovery solution for organizations leveraging Nutanix and AWS S3. By using a limited access policy for the S3 bucket, organizations can ensure secure and efficient replication of snapshots while minimizing costs.

