In order to configure and utilize NFSv4 exports minimum required files version is 3.0.x
In order to configure and utilize NFSv3 exports minimum required files version is 3.5.x
From 3.5 onward, V4 and V3 both are enabled by default. However, if you want to disable a specific version support based on requirement. It is achievable from UI.
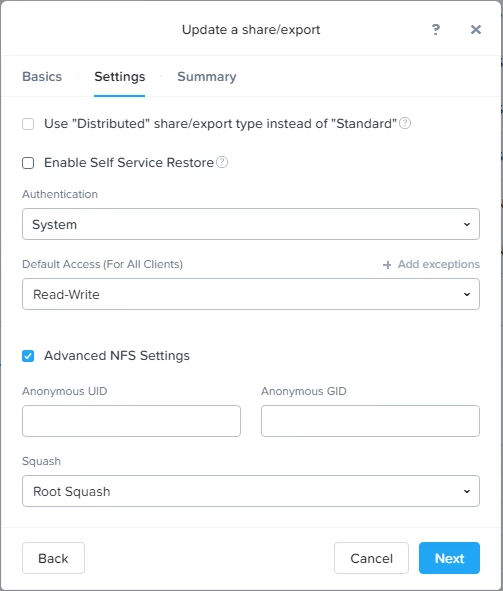
Self Service Restore is supported on NFS based exports from Files 3.5 onward for legacy and new exports.
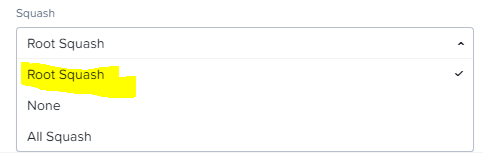
Protocol Management → “Directory Services” → “Use NFS Protocol” → “Show NFS Advanced Options”
https://lh3.googleusercontent.com/7yg_BcwLhX13xo-Ov00VdEnawasj637u521nCti6lzWGxyZQJNyfMJHxKXxjs4FcIzEOPVHf5azF2IGEwixQRnfKEXRehjorDJrE1xRBYUeBP3P5L-GmXPibpM3JOrEDnhneOENC
If V3 is disabled and client tries to access it using v3, we see Permission denied Error
Permission denied
code:
mount.nfs: trying xx.xx.xx.xx prog 100005 vers 3 prot TCP port 20048
mount.nfs: mount(2): Permission denied
mount.nfs: access denied by server while mounting files35ea.xxxx.xx:/pnfs
Basic Information
NFSv4
- NFSv4 Protocol is supported from 3..x on-wards. NFSv4 protocol is not supported on 2.x branches.
- To know more about Client Support (NFSv4), Nutanix recommend to refer Release Notes page Supported Configurations section.
- We support SMB and NFS protocol based share and export configuration on same File Server but not on the same share. This Feature is coming in Files 3.5.1 version known as Multi-Protocol ( Concept of Primary and secondary Protocol Support on Same Share/Export).
- Unmanaged
- Active Directory and LDAP configuration.
- NONE - No Authentication
- SYSTEM - Server implicitly trusts the UID (User ID) and GID (Group) of the User/Group presented by the client.
- Kerberos based (Version 5): Only available when Active Directory and LDAP configuration options are selected under user management.
- Kerberos 5 - DES symmetric key encryption, and an MD5 one-way hash for Nutanix Files credentials.
- Kerberos 5i - In addition to Kerberos 5, uses MD5-based MAC on every request and response. Performs integrity checking of NFS operations using secure checksums to prevent data tampering
- Kerberos 5p - On top of Kerberos 5 and 5i, makes the connection between client and server private by applying DES encryption to prevent traffic sniffing. Most secure setting but has the most performance overhead.
NFSv3 Protocol is supported from 3..5.x on-wards. NFSv4 protocol is not supported on 2..2.x branches.
NFSv3 is a simple stateless protocol where the server does not keep state of individual files being accessed by clients.
No NFSv3 support for Kerberos exports.
No UDP support for V3.
Differences
https://lh6.googleusercontent.com/AOrEj9aJgNucdtLaxoJZ02Xgzk5Kw9ZMAEYRk8RHJE83HYVv96SLqaRD_s7y1-HM52tXKzPere4X5k-tilJdgfEET12qWSEO_zjM_qPZUZyf59YOgYMI0Eeusa-f2H75Zrv6B21P
Mount NFS exports on NFS Client
Example taken here is on CentOS 7.3.1611. For Supported Clients OS and version please refer Release Notes Supported Configurations section.
Step 1 — Downloading and Installing the Components
On the client server, we need to install a package called nfs-common, which provides NFS functionality without including unneeded server components. Again, we will refresh the local package index prior to installation to ensure that we have up-to-date information:
code:
sudo yum check-update
sudo yum install nfs-utils
Step 2 — Creating the Mount Points on the Client
Files is already configured and hosting its export, Now we’ll prepare our client.
In order to make the remote exports available on the client, we need to mount the NFS exports on an empty client directory.
We’ll create two directories for our mounts:
code:
sudo mkdir -p /nfs/general
sudo mkdir -p /nfs/home
Step 3 — Mounting the Directories on the Client
We can mount the shares by addressing our Files server IP address or using Files Server FQDN .
For say:
code:
sudo mount xx.xx.xx.xx:/  /nfs/home/
sudo mount xx.xx.xx.xx:/general-1  /nfs/general/
These commands should mount the exports from the Files onto the client machine.
You can double-check that they mounted successfully in several ways. You can check this with a mount command, but df -h will give you more human readable output illustrates how disk usage is displayed differently for the nfs shares:
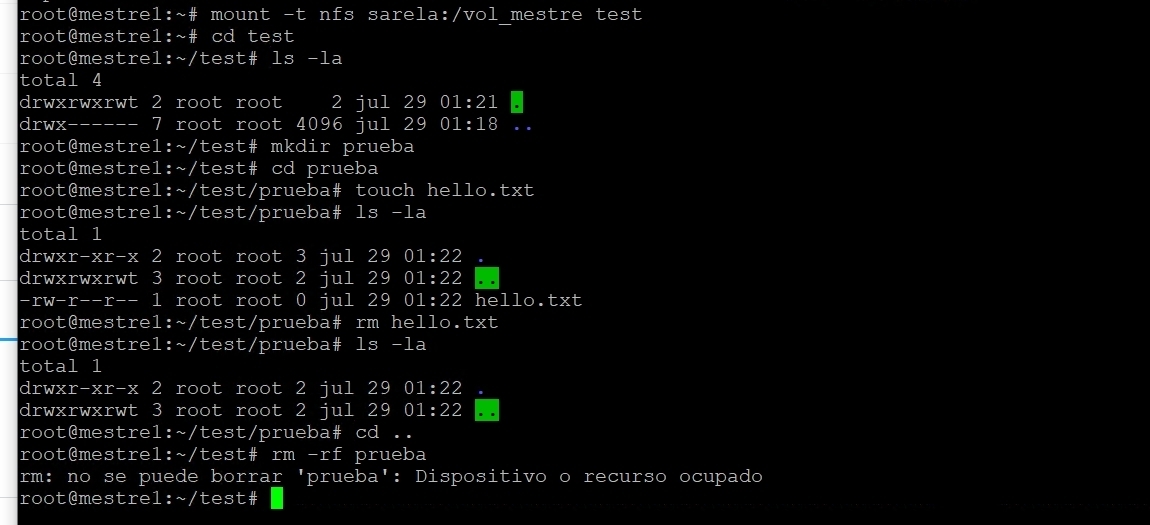
Step 4 — Testing NFS Access
Next, let’s test access to the shares by writing something to each of them.
Example 1: The Non-Distributed Export
First, write a test file to the /nfs/general share.
code:
sudo touch /nfs/general/general.test
Then, check its ownership:
code:
root@0be61a516d4a:/# ls -lah /nfs/general/general.test
-rw-r--r--. 1 4294967294 4294967294 0 Mar 12  2018 /nfs/general/general.test
Created the file as the client machine’s root user via the sudo command, ownership of the file defaults to -2, -2
Lets create a user AFS_TestUser and perform same operation
code:
touch /nfs/general/AFS_TestUser_general.test
Then, check its ownership:
code:
$ ls -lah /nfs/general/AFS_TestUser_general.test
Output
-rw-rw-r--. 1 AFS_TestUser AFS_TestUser 0 Mar 12  2018 /nfs/general/AFS_TestUser_general.test
Example 2: The Distributed export
First, Create a TLD
code:
mkdir /nfs/home/home1/AFS_TestUser
Then, check its ownership:
code:
$ ls -lah  /nfs/home/home1/AFS_TestUser
total 512
drwxrwxr-x. 2 AFS_TestUser AFS_TestUser 2 Mar 12  2018 .