

In a time where we seemingly receive news of a new data breach every week, securely storing and managing your company’s secrets is a critical component of a successful enterprise. HashiCorp Vault enables you to store and tightly control access to tokens, passwords, certificates, encryption keys for protecting secrets and other sensitive data. Vault can even dynamically generate secrets with appropriate permissions at the time of request, completely eliminating the need for password rotation.
A tool like Vault is especially critical for workloads running on Kubernetes. Pods and Services frequently need secrets like Database credentials or API keys. While the built-in Kubernetes Secrets object provides basic functionality, it has several flaws, as by default they’re not encrypted, and there’s no concept of rotation or revocation. Integrating HashiCorp Vault into your Kubernetes environments eliminates these risks, as secrets are encrypted by default, and can easily be rotated, revoked, or generated on demand.
Vault has several methods of authentication, including but not limited to LDAP, GitHub, JWT, and Kubernetes. In this post, we’ll walk through deploying HashiCorp Vault onto your Nutanix environment, and show an example use case of a Kubernetes pod consuming a secret stored in the Vault.
Prerequisites
We’ll be deploying Vault in a highly available setup, with active and standby Vault servers, and a cluster of 3 Consul servers for the storage backend. We’ll cover two methods of deployment, in the first we’ll be utilizing a Nutanix Calm blueprint. Calm will automate the entire deployment, and allow you to manage the Vault application throughout its entire lifecycle. While this means having Prism Central with Calm enabled is a requirement, there will be no issue following along even if you’re new to Calm.The second method of deployment is a manual deployment, for those of you that do not wish to utilize Nutanix Calm. We’ll cover high level steps around this method in an upcoming section.
Vault Deployment with Nutanix Calm
The HashiCorp Vault deployment blueprint is stored on the official Nutanix GitHub. To download the JSON, run the following command from your MacOS or Linux terminal.code:
$ wget https://raw.githubusercontent.com/nutanix/blueprints/master/HashiCorpVault/HashiCorpVault.json
Once the file is downloaded, login to Prism Central, and navigate to the Calm service. Ensure your Calm version is at least 2.6.0, click the Blueprint button on the left pane, and then click Upload Blueprint.

Calm: Upload Blueprint
In the file explorer pop-up, select the HashiCorpVault.json blueprint that was just downloaded. Give the blueprint a descriptive name, like HashiCorpVault, and select the project that corresponds to the AHV cluster where you wish to deploy Vault.
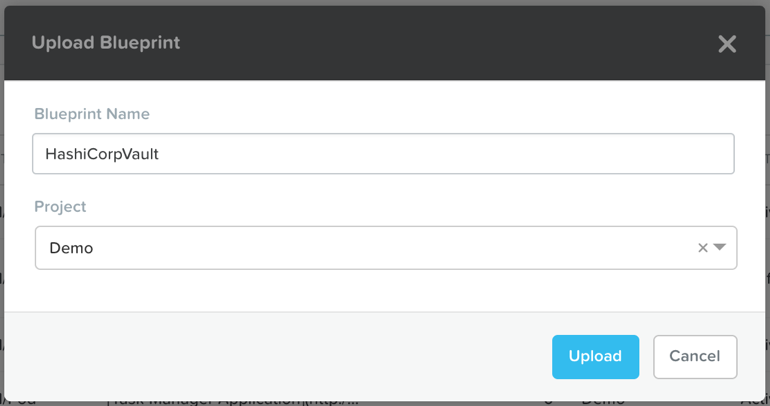
Calm: Name Uploaded Blueprint
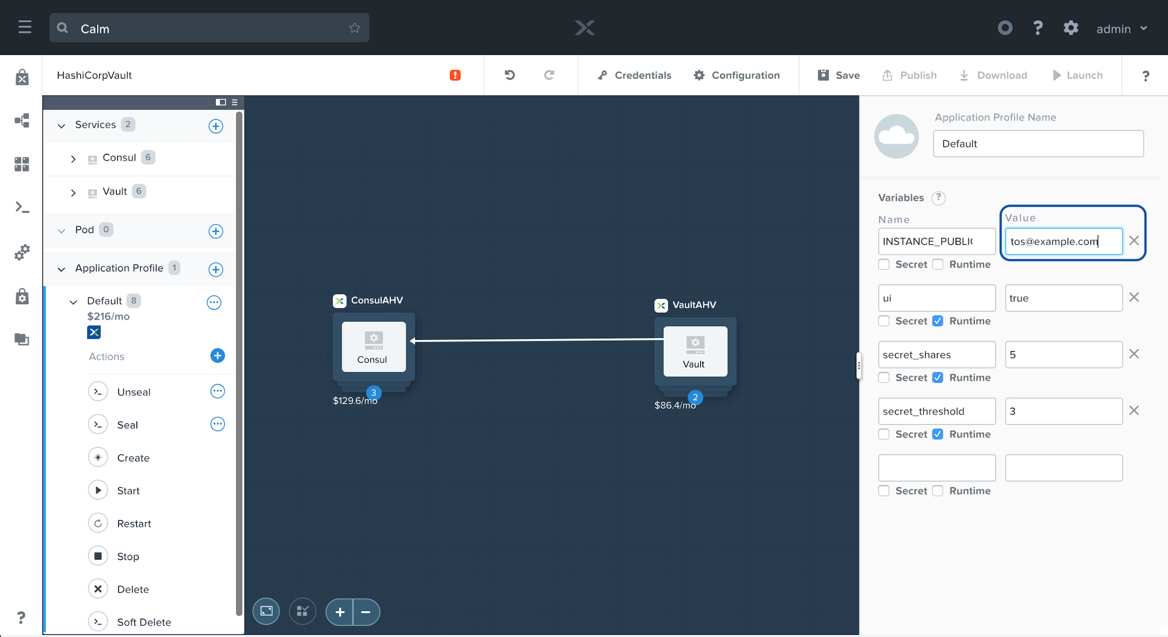
Click Upload, after which you’ll be taken to the blueprint canvas. There is likely only one item that requires modification, the Credentials private key, and its matching public key macro. If you’re a regular Calm user, you likely have experience with this, so feel free to skip ahead.
For those of you new to Calm, the recommended way for VM SSH access is through SSH keys. SSH keys are a more secure method of authenticating, which is particularly critical for a secrets store. To generate a key pair, run the first command to generate a key pair (optionally setting a passphrase), and the next two commands to output their contents.
code:
$ ssh-keygen -t rsa -f ~/vaultkey -C centos@example.com
$ cat ~/vaultkey.pub
$ cat ~/vaultkey
Back within the Calm UI, under the Default Application Profile, we’ll want to overwrite the Value of the INSTANCE_PUBLIC_KEY variable. Simply copy the output of the cat ~/vaultkey.pub command, and paste it in the value field.
Calm: SSH Public Key
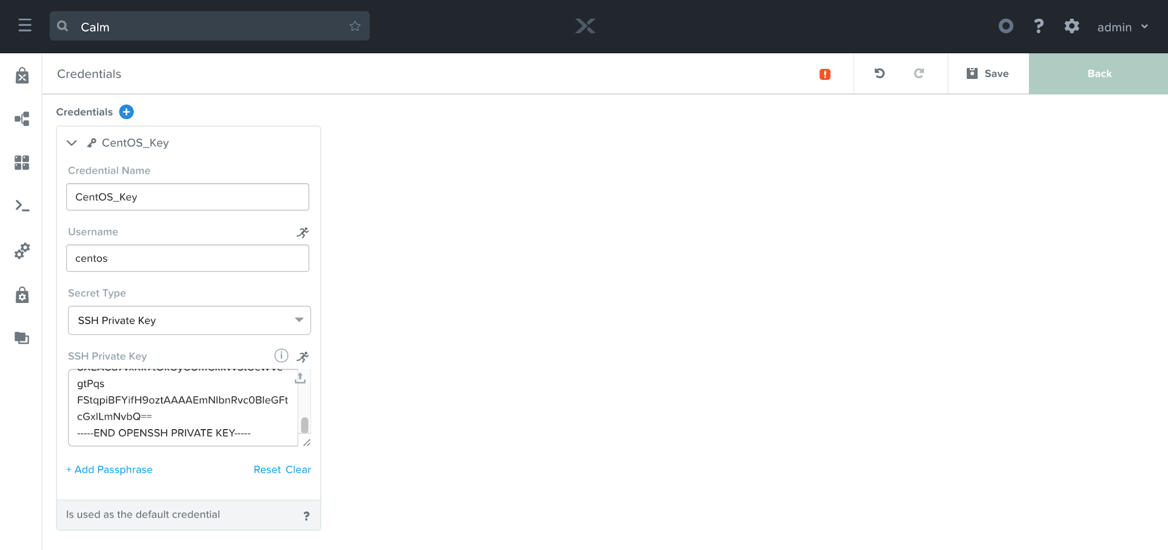
Next, we’ll need to provide the matching private key. To do so, click the Credentials button in the middle of the top banner. On the page that appears, you should see one credential named CentOS_Key. Expand the key, and paste in the output of the cat ~/vaultkey command from above. Be sure to include the BEGIN and END lines, and if you added a passphrase during the generation step, be sure to add it here.
Calm: SSH Private Key
Click the Back button in the upper right, and then click Save. If everything was done correctly, the red error icon should go away, and the Launch button will be clickable. Note: in the event your Calm Environment is not configured, you may need to define the NIC for the Consul and Vault services. To do so, click on the Consul icon in the blueprint canvas, ensure the VM pane is selected along the right, and scroll down to the Network Adapters section. Pick your desired network for the application to communicate on, and then repeat the same steps for the Vault service. Be sure to click Save again.
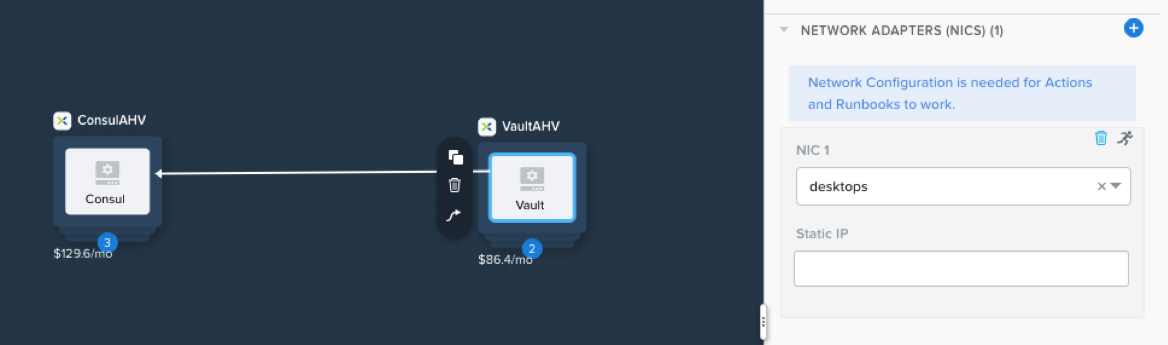
Calm: VM Nic
Click Launch, and on the screen that appears, name your Vault Deployment. Optionally change any of the three runtime variables, whose values represent:
- ui: whether the Vault user interface should be activated. Change the value to false if you do not wish for the UI to be active for this Vault server.
- secret_shares: the number of shares, which are required to unseal the Vault, to split the master key into
- secret_threshold: the minimum number of key shards required to rebuild the master key, and unseal the Vault

Calm: Launching Vault
Click the Create button, where you’ll be taken to the application page. It will stay in a Provisioning state for about 10 minutes, at which point it should change to Running.
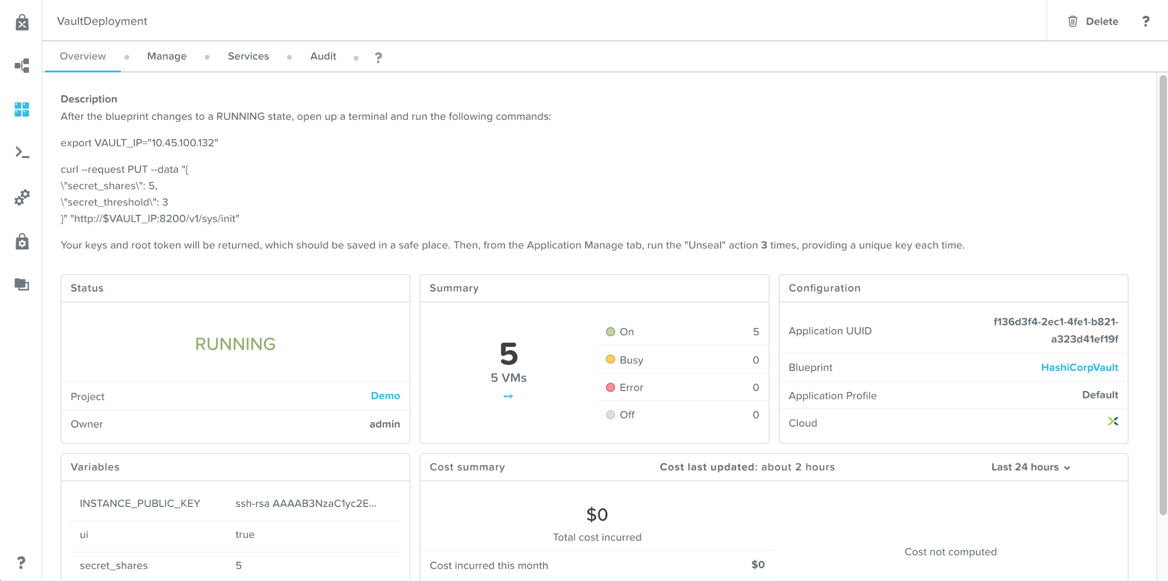
Calm: Application Overview
Vault Deployment via Manual Steps
The overall steps to deploy Vault in a highly available configuration are located on HashiCorp’s website here. To get started, create 5 AHV VMs, all based on the same linux distribution you’re most comfortable with. VM sizing recommendations can be found in the Vault Reference Architecture. We recommend naming the VMs in accordance with the Vault HA deployment guide:- consul_s1
- consul_s2
- consul_s3
- vault_s1
- vault_s2
Operating HashiCorp Vault
Now that we have working Vault instance, we’ll first need to initialize the Vault. Initializing the Vault can only be done once, and the process will result in a number of keys (equal to the secret_shares value), and a root token. The keys should be distributed amongst your team, and stored in a secure location. Alternatively, Vault can be unsealed by authenticating against a master key stored in a trusted cloud KMS, reducing the risk of lost or compromised key shares. If you choose to go that route, follow the appropriate Auto-unseal guide (AWS, Azure, GCP), and then skip ahead to the Example Use Case section of this blog.To initialize the Vault, copy the contents of the export and curl commands listed in the Description field on the Application overview page, and run the commands from your MacOS or Linux terminal. If you manually deployed Vault instead of using the Calm blueprint, simply copy the below commands, substituting in one of your Vault server’s IPs. Note: many commands in this post pipe the output to jq to ease readability. If you do not wish to install jq on your machine, simply remove the end of the command, starting with the | pipe character.
code:
$ export VAULT_IP="10.45.100.132"
$ curl --request PUT --data "{
\"secret_shares\": 5,
\"secret_threshold\": 3
}" "http://$VAULT_IP:8200/v1/sys/init" | jq '.'

# Response:
{
  "keys": [
    "2ce75c0c9ea82f15cf10241b47acb5ea060593f912bf9900fd862a62b7c07353c4",
    "9ccfe79c06bf6598c2cff5a92fb2ce24ffbf1b04c90b39da57061f68d64f7ffbb0",
    "699382aa7e12aa0211df66bd7c9b37b53da1dd8b16011b732a0f647a85bc05c141",
    "a0cd5c6391b34bb02b70e34b105f0b5cf7797a3c876561f5a058c444fe21d402b8",
    "cce1a6e46f6571f330f92125c1296b32ea858e6713a9c9940cb7d804a6ad4e7dea"
  ],
  "keys_base64": [
    "LOdcDJ6oLxXPECQbR6y16gYFk/kSv5kA/YYqYrfAc1PE",
    "nM/nnAa/ZZjCz/WpL7LOJP+/GwTJCznaVwYfaNZPf/uw",
    "aZOCqn4SqgIR32a9fJs3tT2h3YsWARtzKg9keoW8BcFB",
    "oM1cY5GzS7ArcONLEF8LXPd5ejyHZWH1oFjERP4h1AK4",
    "zOGm5G9lcfMw+SElwSlrMuqFjmcTqcmUDLfYBKatTn3q"
  ],
  "root_token": "s.yxry8Qdv5llGHQEAFQNtXrtx"
}
Next, set your root_token as a variable, as we’ll use it extensively in the example use case section. In a production environment, this root token should only be used for initial setup. After that, other authentication methods should be used.
code:
$ export ROOT_TOKEN="s.yxry8Qdv5llGHQEAFQNtXrtx"
Now that the Vault is initialized, we must unseal it. Every Vault server starts in a sealed state, where it has no ability to use the data stored in the backend, since it is encrypted. The process of teaching Vault how to decrypt the data is known as unsealing the Vault.
Within the Calm Application page, under the Manage tab, there is an Unseal action. In order to unseal the Vault, that action must be run equal to the value of the secret_threshold variable, with a different key each time. In a production environment, this action should be run by a different user each time.
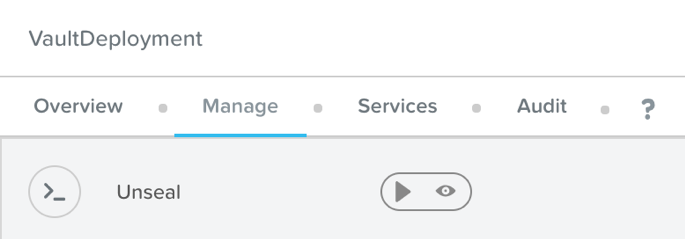
Calm: Unseal Action
To run the Unseal action, simply press the play button, and in the pop-up that appears, enter one of your keys, and press Run. Once the action completes, you’ll need to repeat the action, entering a different key. The Unseal action must be run equal to the value set for secret_threshold, which if you left the default value, is 3.
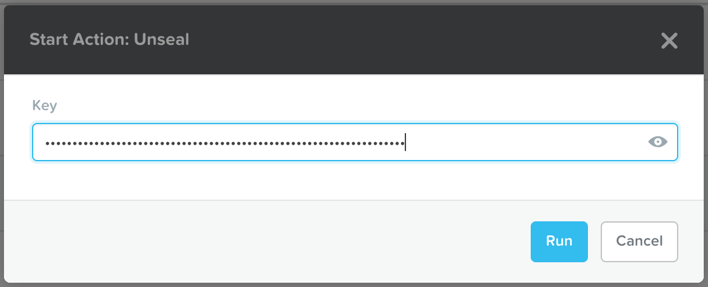
Calm: Unseal Action with Key
Once unsealed, you’re ready to start using Vault. However, take note of the Seal action present in the application action list. A single user can immediately seal the Vault by providing the root token, which allows them to lock down the Vault in an emergency without consulting other operators.
Example Use Case
Now that we have an initialized and unsealed Vault, it’s time for an example use case. We’ll be showing how a Kubernetes pod, with proper authorization, can access a secret stored in the Vault.As mentioned previously, Vault has many methods to authenticate, but we’ll be making use of the Kubernetes auth method. To utilize this method, we’ll need to first create a Service Account and a Cluster Role Binding in our Karbon Kubernetes cluster. Create a file with the following contents, and then apply the file via kubectl.
code:
$ cat vaultServiceAccount.yaml
apiVersion: v1
kind: ServiceAccount
metadata:
  name: vault-auth
---
apiVersion: rbac.authorization.k8s.io/v1beta1
kind: ClusterRoleBinding
metadata:
  name: role-tokenreview-binding
  namespace: default
roleRef:
  apiGroup: rbac.authorization.k8s.io
  kind: ClusterRole
  name: system:auth-delegator
subjects:
- kind: ServiceAccount
  name: vault-auth
  namespace: default

$ kubectl create -f vaultServiceAccount.yaml
When we configure the Kubernetes auth method in later steps, we’ll need to provide the signed JWT of the Service Account, the CA certificate, and the Kubernetes master IP, so let’s set those to variables now.
code:
$ export VAULT_TOKEN_NAME=$(kubectl get sa vault-auth -o jsonpath="{.secrets[*]['name']}")
$ export VAULT_JWT=$(kubectl get secret $VAULT_TOKEN_NAME -o jsonpath="{.data.token}" | base64 --decode; echo)
$ export VAULT_CRT=$(kubectl get secret $VAULT_TOKEN_NAME -o jsonpath="{.data['ca\.crt']}" | base64 --decode | awk '{printf "%s\\n", $0}')
$ export K8S_MASTER=$(kubectl describe nodes `kubectl get nodes | grep master | awk '{print $1}'` | grep Internal | awk '{print $NF}')
We’ll now move on to the Vault portion of the use case. If you haven’t already, be sure to set your VAULT_IP and ROOT_TOKEN variables, as they’ll be used extensively in the following section. First, we’ll create two secrets, as later in the example we’ll see how our pod can access one, but not the other.
code:
$ curl --request POST --header "X-Vault-Token: $ROOT_TOKEN" --data "{
\"username\": \"myusername\",
\"password\": \"mySuperStrongPassword\"
}" "http://$VAULT_IP:8200/v1/secret/my-secret"

$ curl --request POST --header "X-Vault-Token: $ROOT_TOKEN" --data "{
\"username\": \"otherusername\",
\"password\": \"otherSuperStrongPassword\"
}" "http://$VAULT_IP:8200/v1/secret/other-secret"
Take note of the URL path of each command, secret/ represents the default kv (key value) engine, which allows Vault to route the traffic to the corresponding engine at that path. Vault supports many other secret engines beyond kv, making it extremely versatile and unique.
Next, let’s validate our previous commands were written appropriately.
code:
$ curl --request GET --header "X-Vault-Token: $ROOT_TOKEN" "http://$VAULT_IP:8200/v1/secret/my-secret" | jq -r '.data'
$ curl --request GET --header "X-Vault-Token: $ROOT_TOKEN" "http://$VAULT_IP:8200/v1/secret/other-secret" | jq -r '.data'
Each of the above commands should return a different password and username JSON. The next step will be to enable a method to authenticate. As mentioned earlier, we’ll enable the built in Kubernetes authentication method, and then verify it was enabled successfully.
code:
$ curl --request POST --header "X-Vault-Token: $ROOT_TOKEN" --data "{
\"path\": \"/auth/kubernetes/config\",
\"type\": \"kubernetes\"
}" "http://$VAULT_IP:8200/v1/sys/auth/kubernetes"

$ curl --request GET --header "X-Vault-Token: $ROOT_TOKEN" "http://$VAULT_IP:8200/v1/sys/auth" | jq -r '.data'
Now we need to configure the Kubernetes authentication method with the Service Account tokens and certs we configured at the beginning of this example, and validate our configuration.
code:
$ curl --request POST --header "X-Vault-Token: $ROOT_TOKEN" --data "{
\"token_reviewer_jwt\": \"$VAULT_JWT\",
\"kubernetes_host\": \"https://$K8S_MASTER:443\",
\"kubernetes_ca_cert\": \"$VAULT_CRT\"
}" "http://$VAULT_IP:8200/v1/auth/kubernetes/config"

$ curl --request GET --header "X-Vault-Token: $ROOT_TOKEN" "http://$VAULT_IP:8200/v1/auth/kubernetes/config" | jq '.data'
Next, we need to create a Vault policy. Policies define Vault authorization, meaning they control what a user can access. The following command creates a policy titled my-policy, and grants the capability to read data stored at secret/my-secret. Recall when we created our secrets, we made both secret/my-secret and secret/other-secret. This policy does not have any rights to access secret/other-secret.
code:
$ curl --request PUT --header "X-Vault-Token: $ROOT_TOKEN" --data '{
"name":"my-policy","policy":"path \"secret/my-secret\" {\n  capabilities = [\"read\"]\n}\npath \"secret/data/my-secret\" {\n  capabilities = [\"read\"]\n}"
}' "http://$VAULT_IP:8200/v1/sys/policy/my-policy"

$ curl --request GET --header "X-Vault-Token: $ROOT_TOKEN" "http://$VAULT_IP:8200/v1/sys/policy/my-policy" | jq -r '.data'
So far, we’ve created our secrets, enabled and configured our Kubernetes authentication, and configured an authorization policy to read a secret. All that’s remaining is to tie our authentication method and authorization policy together, which we’ll do with a named role. Take note that we’re defining the Kubernetes Service Account, and the Vault policy created previously.
code:
$ curl --request POST --header "X-Vault-Token: $ROOT_TOKEN" --data "{
\"bound_service_account_names\": \"vault-auth\",
\"bound_service_account_namespaces\": \"default\",
\"policies\": [
    \"my-policy\"
  ],
  \"max_ttl\": 259200
}
}" "http://$VAULT_IP:8200/v1/auth/kubernetes/role/my-role"

$ curl --request GET --header "X-Vault-Token: $ROOT_TOKEN" "http://$VAULT_IP:8200/v1/auth/kubernetes/role/my-role" | jq -r '.data'
It’s now time to test out our configuration, which we’ll do by creating a temporary Kubernetes pod that we’ll execute commands from. Let’s create the pod, and install some necessary software with the following commands (you may have to hit enter a couple of times after the first command).
code:
$ kubectl run tmp --rm -i --tty --serviceaccount=vault-auth --image centos --env="VAULT_IP=$VAULT_IP"
pod$ yum -y update && yum -y install epel-release && yum -y install curl jq
With the next commands, we’ll first get the token for this pod, then we’ll use the token to log in to the Vault, specifying my-role that we created earlier. Finally, we’ll set the returning Vault token equal to a variable to use shortly.
code:
pod$ KUBE_JWT=$(cat /var/run/secrets/kubernetes.io/serviceaccount/token)
pod$ VAULT_LOGIN=$(curl --request POST --data '{"jwt": "'"$KUBE_JWT"'", "role": "my-role"}' http://$VAULT_IP:8200/v1/auth/kubernetes/login)
pod$ VAULT_JWT=$(echo $VAULT_LOGIN | jq -r '.auth.client_token')
Now that we have our Vault token, we’ll use it to make two calls to the Vault server, the first to access my-secret, and the second to access other-secret.
code:
pod$ curl --header "X-Vault-Token: $VAULT_JWT" http://$VAULT_IP:8200/v1/secret/my-secret | jq -r '.data'
pod$ curl --header "X-Vault-Token: $VAULT_JWT" http://$VAULT_IP:8200/v1/secret/other-secret | jq -r '.data'
Since our role only defined access to secret/my-secret, we should expect that the first command returns our credentials, but the second does not. As expected, this is the result from my setup:
code:
pod$ curl --header "X-Vault-Token: $VAULT_JWT" http://$VAULT_IP:8200/v1/secret/my-secret | jq -r '.data'
{
  "password": "mySuperStrongPassword",
  "username": "myusername"
}
pod$ curl --header "X-Vault-Token: $VAULT_JWT" http://$VAULT_IP:8200/v1/secret/other-secret | jq -r '.data'
null
In production use cases, it’s best practice to have an init or sidecar container handles all of the Vault authentication and stores either the token or credentials in a known location. This allows for minimal or no change in the application architecture, as the application is not even aware of Vault. There are many open source containers available on GitHub today.
Summary
In this blog we showed how simple it is to deploy Vault in high availability mode with Nutanix Calm. We then walked through an example use case of a Karbon Kubernetes pod consuming a key/value based secret stored in the Vault. However, this is just scratching the surface of the capabilities of HashiCorp Vault, as it has dozens of secrets engines beyond key/value, and it has dozens of authentication methods beyond Kubernetes. Thanks for your time today!Disclaimer: This blog may contain links to external websites that are not part of Nutanix.com. Nutanix does not control these sites and disclaims all responsibility for the content or accuracy of any external site. Our decision to link to an external site should not be considered an endorsement of any content on such site.
© 2019 Nutanix, Inc. All rights reserved. Nutanix, the Nutanix logo and the other Nutanix products and features mentioned herein are registered trademarks or trademarks of Nutanix, Inc. in the United States and other countries. All other brand names mentioned herein are for identification purposes only and may be the trademarks of their respective holder(s).