The technical piece below found our way through our partner channels. Installation instructions for Red Hat OpenShift on Nutanix are detailed in the documentation below. Enjoy, and as always feel free to provide us with feedback.
User Provisioned Installation of Red Hat OpenShift 4.3 on Nutanix AHV 5.15
This manual was created during a proof of concept environment using Nutanix AHV 5.15, the KVM-based hypervisor of Nutanix, with OpenShift 4.3 in combination with the Nutanix CSI driver. The Nutanix CSI driver provides scalable, persistent storage for stateful applications using Nutanix Files and Nutanix Volumes.
Please note: At the time of writing, Nutanix AHV in combination with OpenShift is supported by Nutanix, but not certified by Red Hat. If certification is required, clients are advised to use any of the other hypervisors supported by Nutanix.
The installation steps followed are documented in the IBM Cloud Architecture & Solution Engineering repository guide.
The PoC environment configuration defers from the guide provided by IBM Cloud Architecture & Solution Engineering:
- Usage of Windows DHCP and DNS.
- Custom ISO for installing the RHCOS nodes. The custom ISO provides input to the CoreOS installation
- image which is made available on the Installation Node HTTP server. (No PXE server is used)
- One load balancer for control-plane and compute nodes. (guide uses two separate load balancers for
- control-planes and compute nodes)
- Installation of Nutanix CSI driver and storage classes
- Control-plane and Compute Node sizing.
| Node Type | CPU | Memory | Purpose |
| Bootstrap | 4 | 16GB | Bootstrap Node |
| Control-plane1 | 4 | 16GB | Master Nodes |
| Control-plane2 | 4 | 16GB | Master Nodes |
| Control-plane3 | 4 | 16GB | Master Nodes |
| Compute1 | 8 | 32 GB | Worker Nodes |
| Compute2 | 8 | 32 GB | Worker Nodes |
| Compute3 | 8 | 32 GB | Worker Nodes |
Install Steps for Nutanix AHV
Most of the steps follow the instructions of the guide provided by IBM Cloud Architecture & Solution Engineering. Additional instructions are required for the PoC environment. These steps are marked bold and are described in more detail in the next chapter.
- Create an installation node with embedded web server
- Download and deploy the .img and metal config files from Red Hat
- Download and extract the OpenShift client and installer onto your installation server
- Create the install-config.yaml file on your installation server
- Create the ignition files for your deployment
- Create Cluster VMʼs (boot, control-plane, – and compute nodes)
- Configure the DHCP server (reservation for Cluster VMʼs, including load balancer)
- Configure DNS to support cluster
- Create and configure a load balancer for the control plane and compute nodes
- Create custom installer OpenShift iso (no pxe server) and attach to nodes
- Complete the bootstrap process
- Complete the installation
- Login to your new cluster and configure authentication
- Install Nutanix CSI
- Configure Persistent Storage for your image registry
Additional Instructions – Install steps for Nutanix AHV
Instructions Step 2. Download and deploy the .img and metal config files from Red Hat
Download the Installer ISO for OpenShift RHCOS and the OpenShift RHCOS installation image named:
Installer ISO for OpenShift RHCOS
cd /opt
wget https://mirror.openshift.com/pub/openshiftv4/dependencies/rhcos/4.3/latest/rhcos-4.3.8-x86_64-installer.x86_64.iso
Installation Image – OpenShift RHCOS Change the <project directory> name to reflect your situation
cd /opt/<project directory>
wget https://mirror.openshift.com/pub/openshiftv4/dependencies/rhcos/4.3/latest/rhcos-4.3.8-x86_64-metal.x86_64.raw.gz
Instructions Step 9. Create and configure a load balancer for the control plane and compute nodes
The guide is based on two separate load balancers, one for control planes and one for compute nodes. For the Nutanix AHV environment one load balancer is used for control and compute nodes.
- Append haproxy.cfg and change the <node_ip_adresses> accordingly
vi /etc/haproxy/haproxy.cfg
<output_omitted>
#---------------------------------------------------------------------
# OpenShift 4.3 Loadbalancing for control-plane nodes & compute nodes
#---------------------------------------------------------------------
frontend openshift-api-server
	bind *:6443
	default_backend openshift-api-server
	mode tcp
	option tcplog

backend openshift-api-server
	balance source
	mode tcp
	server control-plane0 <node_ip_address>:6443 check
	server control-plane1 <node_ip_address>:6443 check
	server control-plane2 <node_ip_address>:6443 check

frontend machine-config-server
	bind *:22623
	default_backend machine-config-server
	mode tcp
	option tcplog

backend machine-config-server
	balance source
	mode tcp
	server control-plane0 <node_ip_address>:22623 check
	server control-plane1 <node_ip_address>:22623 check
	server control-plane2 <node_ip_address>:22623 check

frontend ingress-http
	bind *:80
	default_backend ingress-http
	mode tcp
	option tcplog

backend ingress-http
	balance source
	mode tcp
	server compute0 <node_ip_address>:80 check
	server compute1 <node_ip_address>:80 check
	server compute2 <node_ip_address>:80 check

frontend ingress-https
	bind *:443
	default_backend ingress-https
	mode tcp
	option tcplog

backend ingress-https
	balance source
	mode tcp
	server compute0 <node_ip_address>:443 check
	server compute1 <node_ip_address>:443 check
	server compute2 <node_ip_address>:443 check

listen haproxy-monitoring
	bind *:1936
	mode http
	stats enable
	stats hide-version
	stats realm Haproxy\ Statistics
	stats uri /
	stats auth admin:admin
Instructions Step 10. Create custom installer OpenShift iso (no pxe server) and attached to nodes
No PXE server is used. Instead, a custom ISO for installing the RHCOS nodes is used. The custom ISO provides input to the CoreOS installation image which is made available on the Installation Node web server.
Instruction/Configuration Custom ISO:
- Mount the OpenShift RHCOS 4.3 installation ISO on the installation server, so that the content can be synchronized towards a directory that can be adjusted
mkdir /opt/iso
mount -o loop /opt/rhcos-4.3.8-x86_64-installer.x86_64.iso /opt/iso/
mkdir /opt/new-iso/
rsync -a /opt/iso/ /opt/new-iso- Update the isolinux config file
- Change the append initrd= value
- Replace the <ipaddress_installation_node> value with the ip address of the installation node
- Replace the <project directory> value with the chosen project name
vi /opt/new-iso/isolinux/isolinux.cfg
<output_omitted>
label linux
	menu label ^Install RHEL CoreOS
	kernel /images/vmlinuz
	append initrd=/images/initramfs.img nomodeset rd.neednet=1
coreos.inst=yes coreos.inst.install_dev=sda
coreos.inst.image_url=http://<ipaddress_installation_node>:8080/<project-folder>/rhcos-4.3.8-x86_64-metal.x86_64.raw.gz
coreos.inst.ignition_url=http://<ipaddress_installation_node>:8080/<project-folder>/*.ign ip=dhcp
<output_omitted>- Create custom ISO
cd /opt/new-iso/
mkisofs -o opt/rhcos-4.3.8-x86_64-installer.x86_64_custom.iso -b
isolinux/isolinux.bin -c isolinux/boot.cat -no-emul-boot -boot-load-size 4 -boot-info-table -J -R .- Upload image to Nutanix PRISM Central Image Service
Upload the rhcos-4.3.8-x86_64-installer.x86_64_custom.iso to the Nutanix Prism Central Image Service, see the Nutanix manual for assistance.
- First boot instructions – Nodes
- Attach the ISO image to the CD-ROM of the manually created Bootstrap, control-plane and Compute Nodes by updating the VM’s in Nutanix.
- Start the VM and launch the VM Console in Nutanix.
- In the RHCOS installation splash screen, hit “tab” key
- Depending on the type of node (bootstrap, control-plane or compute) replace the asterisk (*) with the correct name (bootstrap, master or worker) to provide the append initrd= with the appropriate ignition file.
Example used in PoC environment:
Bootnode:
append initrd=/images/initramfs.img nomodeset rd.neednet=1 coreos.inst=yes
coreos.inst.install_dev=sda
coreos.inst.image_url=http://<ipaddress_installation_node>:8080/mondrian/rhcos-4.3.8-x86_64-metal.x86_64.raw.gz
coreos.inst.ignition_url=http://<ipaddress_installation_node>:8080/mondrian/bootstrap.ign
ip=dhcp
Master/Control-Plane nodes:
append initrd=/images/initramfs.img nomodeset rd.neednet=1 coreos.inst=yes
coreos.inst.install_dev=sda
coreos.inst.image_url=http://<ipaddress_installation_node>:8080/mondrian/rhcos-4.3.8-x86_64-metal.x86_64.raw.gz
coreos.inst.ignition_url=http://<ipaddress_installation_node>:8080/mondrian/master.ign
ip=dhcp
Worker/Compute nodes:
append initrd=/images/initramfs.img nomodeset rd.neednet=1 coreos.inst=yes
coreos.inst.install_dev=sda
coreos.inst.image_url=http://<ipaddress_installation_node>:8080/mondrian/rhcos-4.3.8-x86_64-metal.x86_64.raw.gz
coreos.inst.ignition_url=http://<ipaddress_installation_node>:8080/mondrian/worker.ign
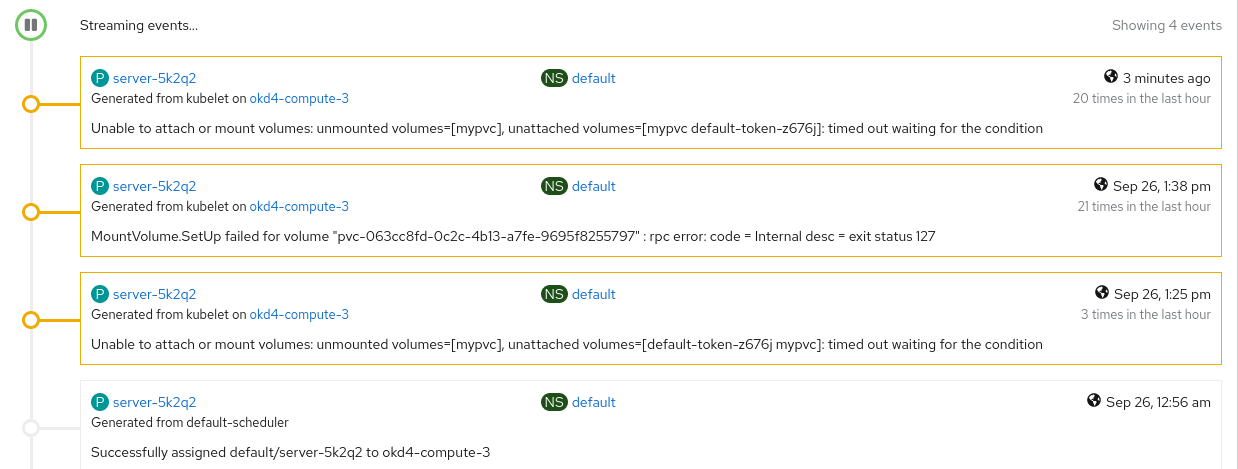
ip=dhcpInstructions Step 14. Install Nutanix CSI
Follow the instructions as outlined on the Nutanix Support Portal or the summarized steps below;
Procedure
- Download the deployment YAML files
- Deploy RBAC
- Deploy StatefulSet and DaemonSet
- Create and deploy CSI Driver object
- Create Secret for Nutanix Volumes
- Create Storage Classes for Nutanix Volumes and Nutanix Files
1. Download the deployment YAML files
- Download deployment files to Installation Node
cd /opt
wget http://download.nutanix.com/csi/v1.1.1/csi-v1.1.1.tar.gz- Create directory csi_nutanix
mkdir /opt/csi_nutanix- Untar the file and change to directory
tar xvf csi-v1.1.1.tar.gz /opt/csi_nutanix/
cd /opt/csi_nutanix/
2. Deploy RBAC
- Login to OpenShift Cluster on the Installation Node. Change the <project directory> to reflect your situation
export KUBECONFIG=/opt/<project directory>/auth/kubeconfig
oc login- Deploy ServiceAccounts, ClusterRole, and ClusterRole binding with the ntnx-csi-rbac.yaml file.
oc create -f ntnx-csi-rbac.yaml3. Deploy StatefulSet and DaemonSet
- Deploy DaemonSet and StatefulSet
oc create -f ntnx-csi-node.yaml
oc create -f ntnx-csi-provisioner.yaml
4. Create and deploy a CSI Driver object
- Create CSI Driver Object yaml file (csi-driver.yaml)
apiVersion: storage.k8s.io/v1beta1
kind: CSIDriver
metadata:
	name: com.nutanix.csi
spec:
	attachRequired: false
podInfoOnMount: true- Deploy the CSI Driver object yaml file
oc create -f csi-driver.yaml5. Create Secret for Nutanix Volumes
- Create Secret yaml (ntnx-csi-secret.yaml)
apiVersion: v1
kind: Secret
metadata:
	name: ntnx-secret
	namespace: kube-system
	data:
# base64 encoded prism-ip:prism-port:admin:password.
# E.g.: echo -n "<prism-ip>:9440:admin:mypassword" | base64 key: <output-omitted - this should state de base64 encoded string>- Deploy the Secret yaml file
oc create -f ntnx-csi-secret.yaml6. Create Storage Classes for Nutanix Volumes and Nutanix Files
- Create the storage class yaml files
Nutanix Files storage classes
Example file used in PoC environment (ntnx-csi-sc-files-delete.yaml) for storage class for Nutanix Files with reclaim policy “Delete”. Change the nfsServer and nfsPath parameters to reflect your situation.
kind: StorageClass
apiVersion: storage.k8s.io/v1
metadata:
	name: ntnx-files-delete
	annonations:
		storageclass.kubernetes.io/is-default-class: "false"
provisioner: com.nutanix.csi
parameters:
	storageType: NutanixFiles
	nfsServer: fs-mod.ibmpoc.local
	nfsPath: /mondrian
reclaimPolicy: Delete
Example file (ntnx-csi-sc-files-retain.yaml) for storage class for Nutanix Files with reclaim policy “Retain”. This storage class is the default for the PoC environment. Change the nfsServer and nfsPath parameters to reflect your situation.
kind: StorageClass
apiVersion: storage.k8s.io/v1
metadata:
	name: ntnx-files-retain
	annotations:
		storageclass.kubernetes.io/is-default-class: 'true'
provisioner: com.nutanix.csi
parameters:
	storageType: NutanixFiles
	nfsServer: fs-mod.ibmpoc.local
	nfsPath: /mondrian
reclaimPolicy: Retain
Nutanix Volumes storage classes
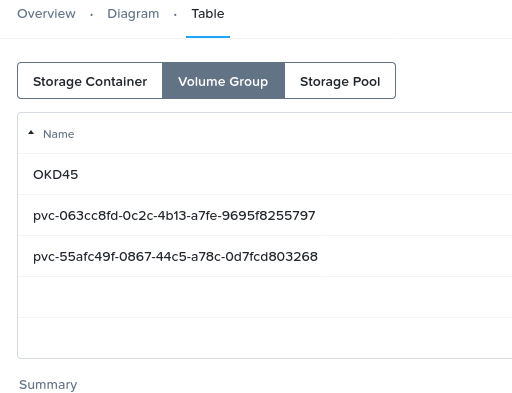
Example file (ntnx-csi-sc-volumes-delete.yaml) for storage class for Nutanix Volumes with reclaim policy “Delete”. Change the dataServiceEndPoint and storageContainer to reflect your situation.
kind: StorageClass
apiVersion: storage.k8s.io/v1
metadata:
	name: ntnx-volumes-delete
	annonations:
		storageclass.kubernetes.io/is-default-class: "false"
provisioner: com.nutanix.csi
parameters:
	csi.storage.k8s.io/provisioner-secret-name: ntnx-secret
	csi.storage.k8s.io/provisioner-secret-namespace: kube-system
	csi.storage.k8s.io/node-publish-secret-name: ntnx-secret
	csi.storage.k8s.io/node-publish-secret-namespace: kube-system
	csi.storage.k8s.io/controller-expand-secret-name: ntnx-secret
	csi.storage.k8s.io/controller-expand-secret-namespace: kube-system
	csi.storage.k8s.io/fstype: xfs
	dataServiceEndPoint: <dataServiceEndPoint-IP>:3260
	storageContainer: rhocp-container
	storageType: NutanixVolumes
allowVolumeExpansion: true
reclaimPolicy: Delete
Example file (ntnx-csi-sc-volumes-retain.yaml) for storage class for Nutanix Volumes with reclaim policy “Retain”. Change the dataServiceEndPoint and storageContainer to reflect your situation.
kind: StorageClass
apiVersion: storage.k8s.io/v1
metadata:
	name: ntnx-volumes-retain
	annotations:
		storageclass.kubernetes.io/is-default-class: 'false'
provisioner: com.nutanix.csi
parameters:
	csi.storage.k8s.io/provisioner-secret-name: ntnx-secret
	csi.storage.k8s.io/provisioner-secret-namespace: kube-system
	csi.storage.k8s.io/node-publish-secret-name: ntnx-secret
	csi.storage.k8s.io/node-publish-secret-namespace: kube-system
	csi.storage.k8s.io/controller-expand-secret-name: ntnx-secret
	csi.storage.k8s.io/controller-expand-secret-namespace: kube-system
	csi.storage.k8s.io/fstype: xfs
	dataServiceEndPoint: <dataServiceEndPoint-IP>:3260
	storageContainer: rhocp-container
	storageType: NutanixVolumes
allowVolumeExpansion: true
reclaimPolicy: Retain- Deploy storage classes for Nutanix Files and Volumes
oc create -f ntnx-csi-sc-files-delete.yaml
oc create -f ntnx-csi-sc-files-retain.yaml
oc create -f ntnx-csi-sc-volumes-delete.yaml
oc create -f ntnx-csi-sc-volumes-retain.yaml
That concludes the installation instructions for Red Hat OpenShift on Nutanix. Feel free to let us know if you found this article helpful or if you have any other feedback!