Convert Your Cluster to AHV and Configure Leap for Disaster Recovery | Nutanix Community
Skip to main content

On my previous blog (Link) I showed you how to build a metro availability. Now I want to "upgrade" both clusters to AHV and enable data protection with the help of Leap to achieve an RPO of zero (0).

This blog post are two posts combined. First is the in-place conversion of ESX to AHV and the second is how to enable and configure Leap.

Conversion

Before we can change the hypervisor to AHV there are a couple of requirements/things to remember:

  • NGT tools must be installed in each VM: This makes sure we can boot the guest vm's after conversion.
  • Each host must have a uplink NIC team.
  • LACP based load balancing is not supported: So make sure this is turned off on the dSwitch (and on the physical switch).
  • HA and DRS should be enabled;
  • DR activities will be paused during conversion.

As my setup is not changed/optimized, I need to change some settings. My vSwitch0 has the following configuration:
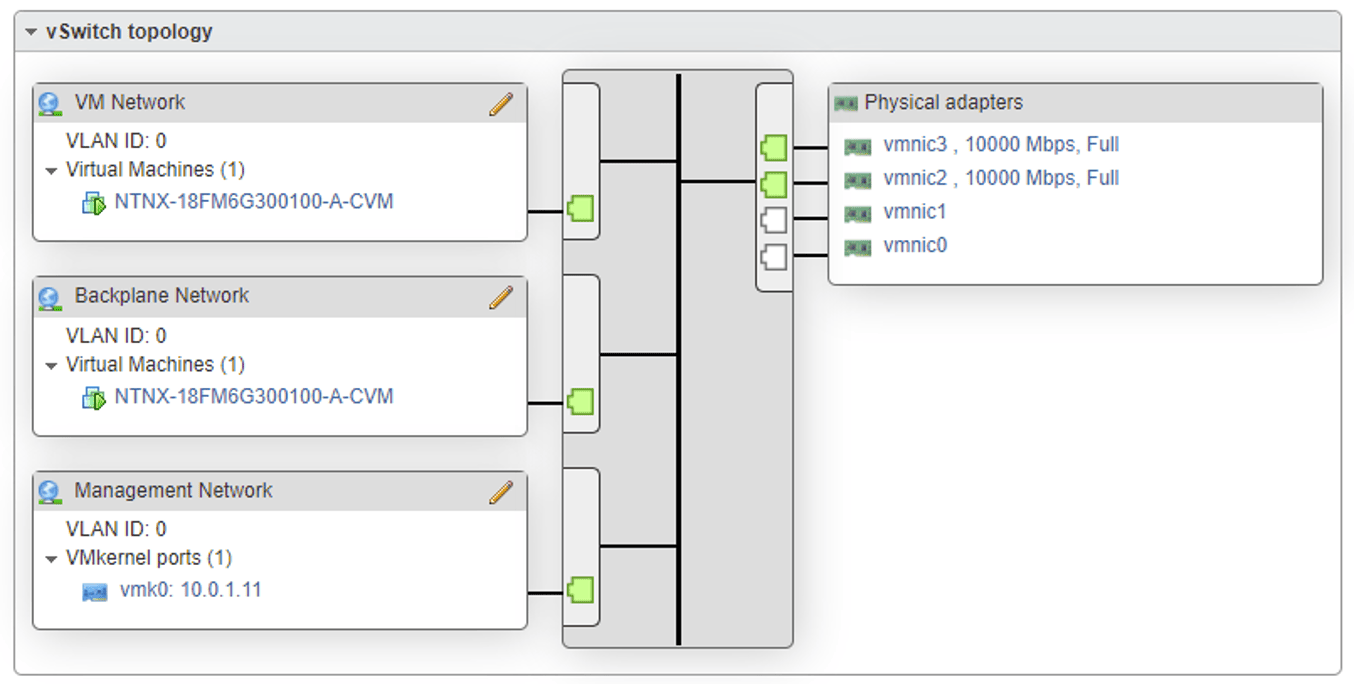
This will give the following error: "external vswitch vSwitch0 does not have homogeneous uplinks" during validation. As there are 4 nics connected to the vSwitch (vmnic0 and 1 are 1Gbps nics) I need to remove the NICs which are not in use.
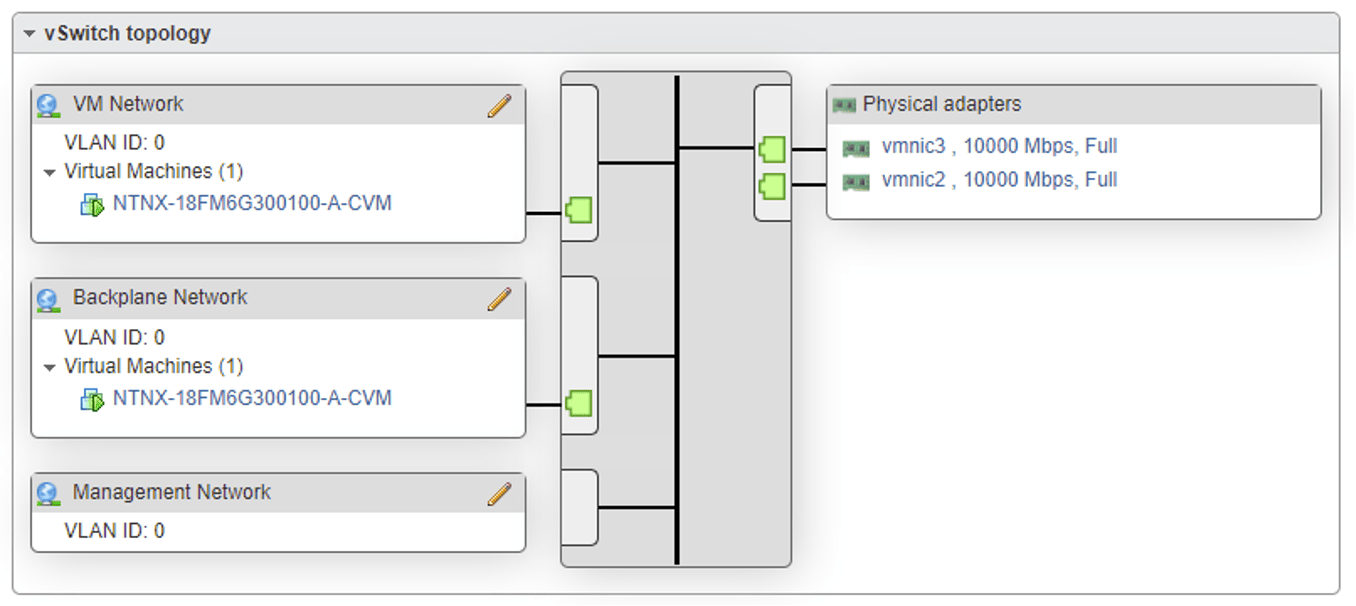
Next step is to disable admission control in the VMware cluster:
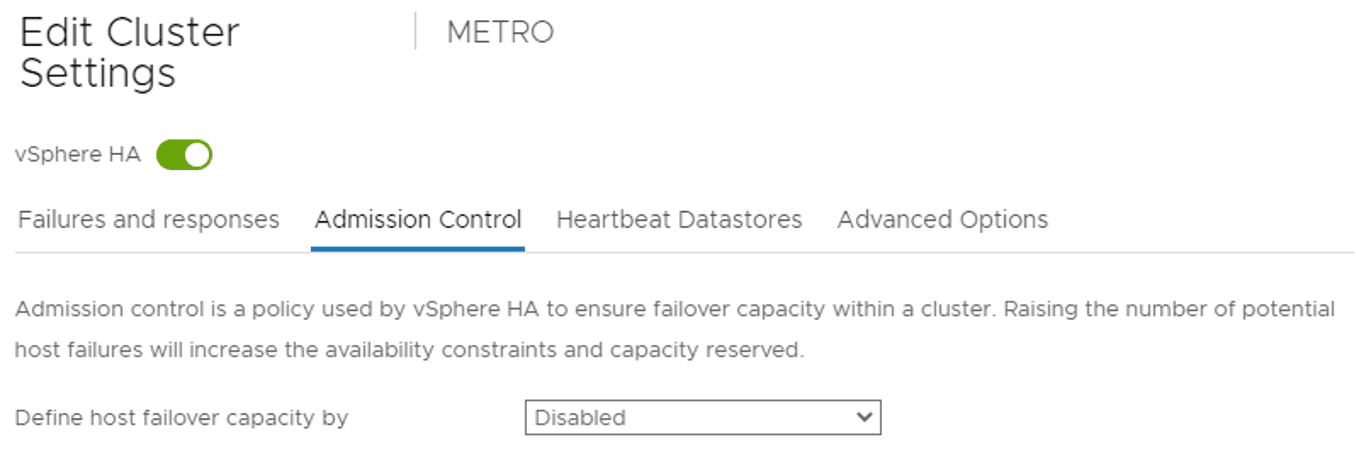
And I need to delete metro availability. (Yes delete, so make sure all machines are running on the correct nodes and storage containers.

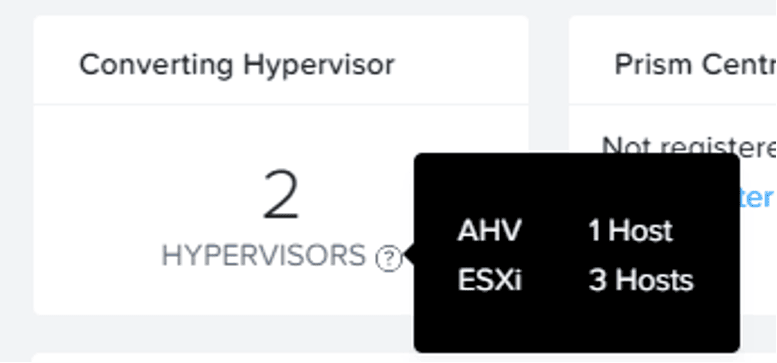
When all is in place, we can do the conversion. We start with CLUSTER-2 as my vCenter is running on CLUSTER-1. In Prism Element go to Settings --> Convert Cluster. Click on: Validate and provide vCenter credentials. (What is validating doing? Link). When all is correct click on the convert button. The following box will be shown:
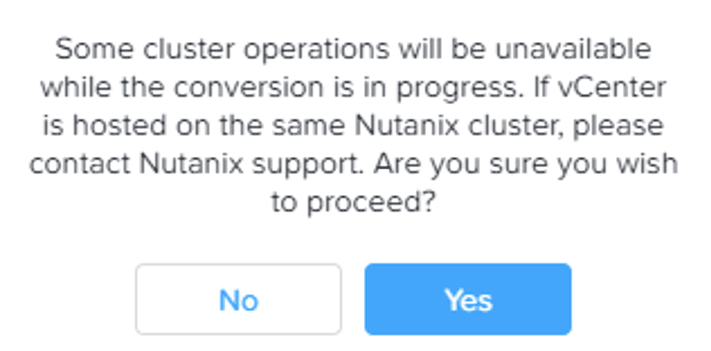
This is an important one. As typed above, my vCenter is currently running on CLUSTER-1 and for now I'm good 😉 Just click Yes.

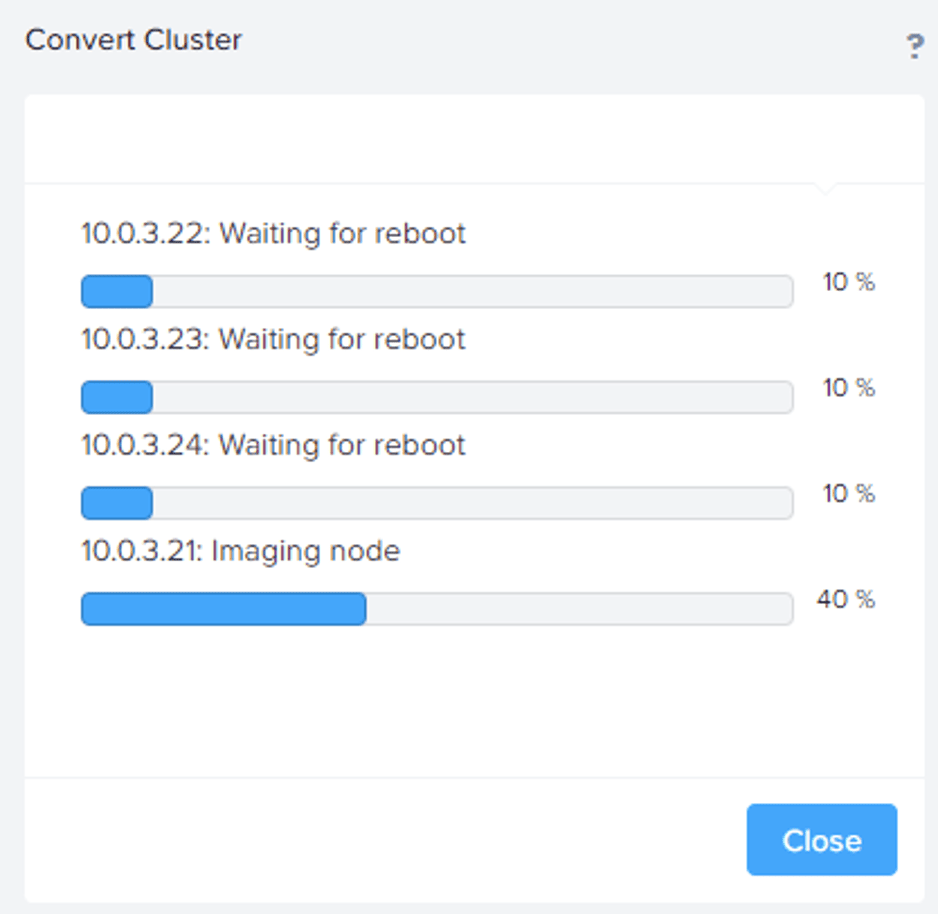
The nodes are being reimaged to AHV one at the time. And the steps are:

Imaging node -> Rebooting into installer -> Starting host installer, Will run CVM Installer in a while -> Running CVM Installer, Starting host installer -> Installing AHV, Running CVM Installer -> Running CVM Installer -> Rebooting node. This may take several minutes -> All operations completed successfully. Goto start ;)Ā 

One host done, three to go. In my case 1 host took 30 minutes.

Next, I will convert my other cluster. But vCenter is running on it so this is not supported.Ā In case you are running into the same issues, first migrate vCenter to a temporary ESX server before proceeding this conversion.

When done I did some cleaning: Deleted the METRO Storage Containers which are from the other sites. Deleted the remotes sites under data protection and deleted vCenter and vCLS VMS ;)

Enable and Configure Leap

Because the METRO Storage Containers are deleted make sure they are recreated again to match the name from the other cluster. (I've renamed them to LEAP_01-02 and LEAP_02-01).

In Prism Central (my both clusters are connected to the same Prism Central) click on Prism Central Settings --> Enable Leap. Make sure the requirements are met and click on "Enable". If you are using different Prism Central instances, make sure a witness vm is deployed and configured and Availability zones are configured. (See previous blog for this).
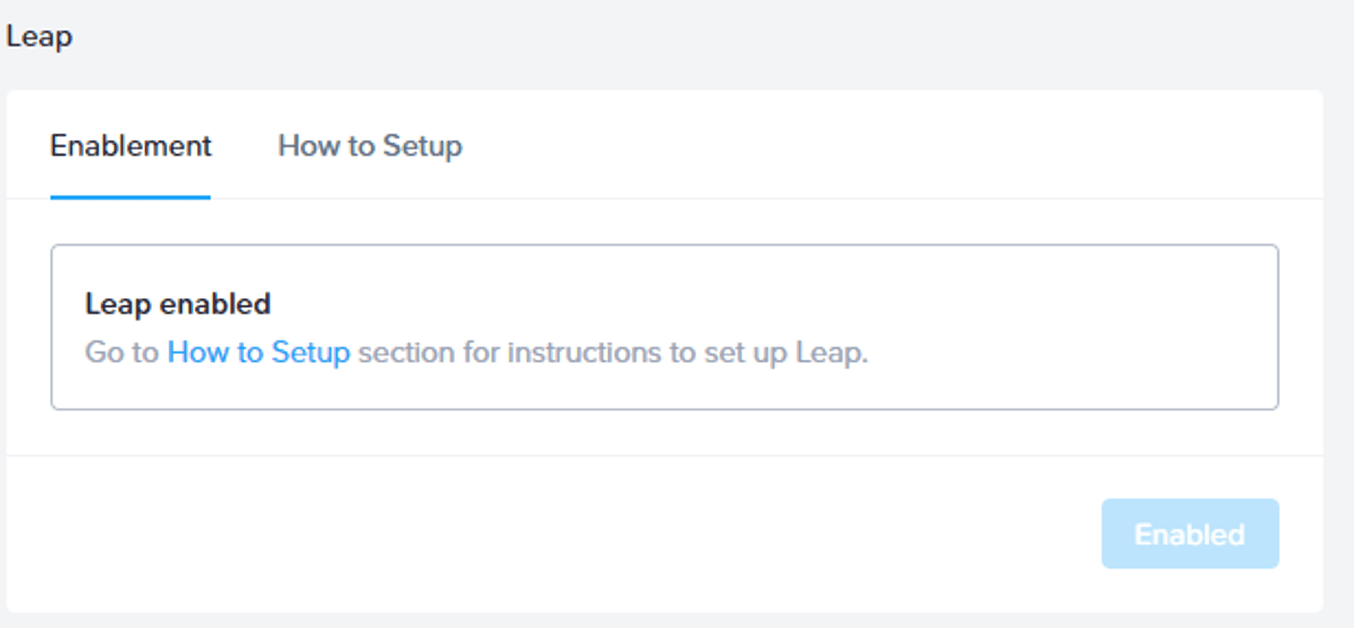
When Leap is enabled, we need to create a category. When machines are tagged with this category they will be protected. Click on the hamburger menu and select Administration --> Categories --> Create Category.
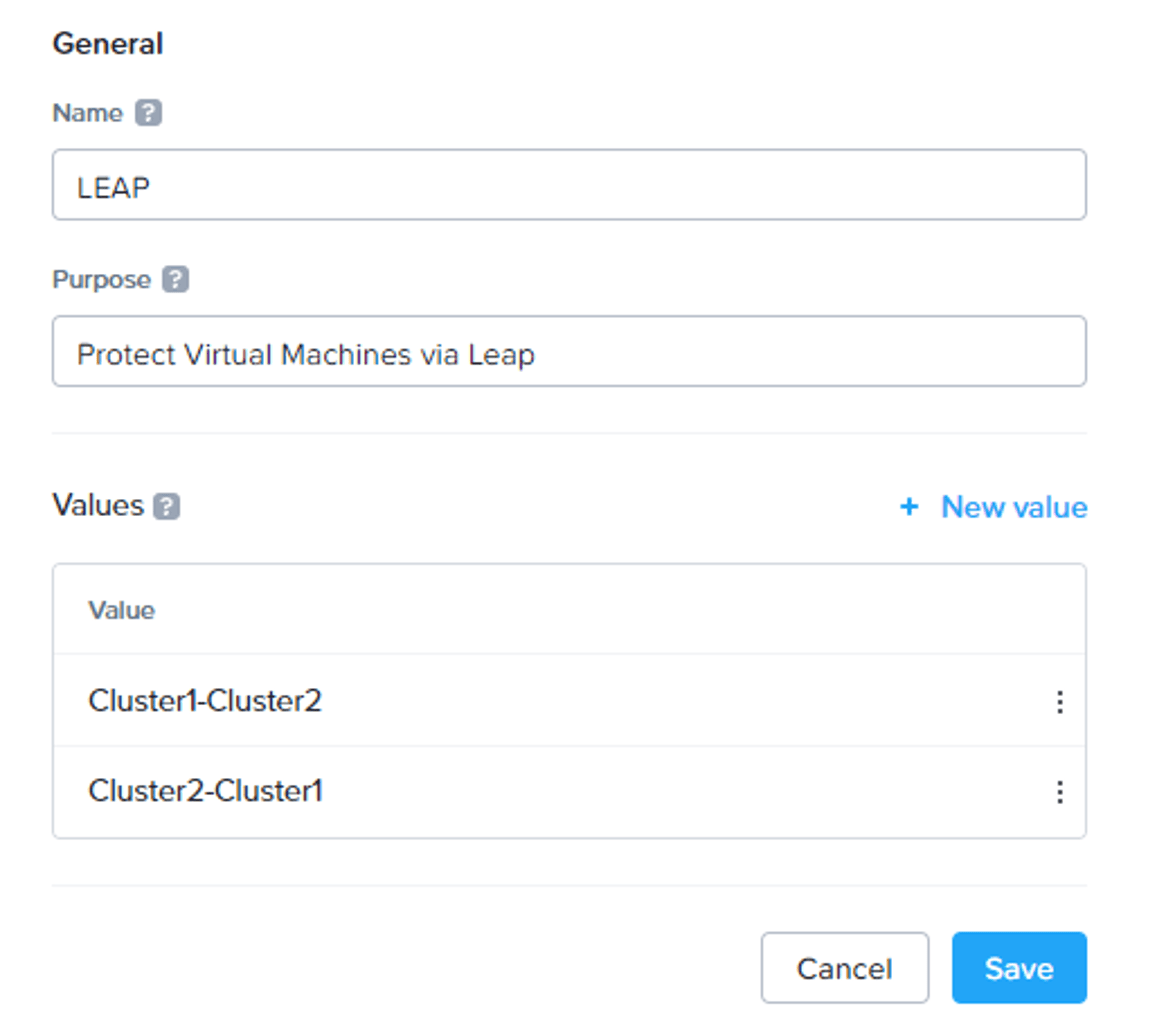
Create the category as described above. We tag machines in CLUSTER-1 with the Leap: Cluster1-Cluster2 tag and vice versa.

It is time to create Protection Policies. Click on the hamburger menu and select Data Protection --> Protection Policies --> Create Protection Policy.
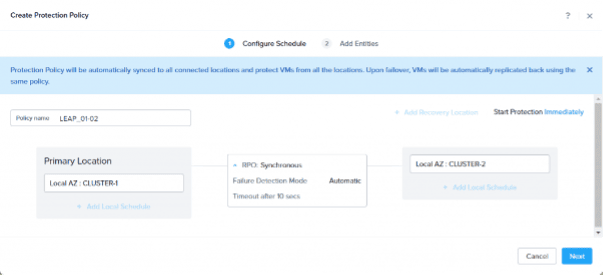
Create a policy as showed in the screenshot. You can choose between asynchronous or synchronous. We want a RPO of zero (0) so synchronous is the method. More information here:Ā Link. Click Next for the entities screen.
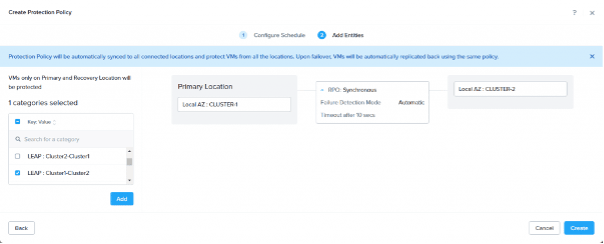
Here we select the LEAP:Cluster1-Cluster2 category and click add and create. Now create a second protection policy for CLUSTER-2 to CLUSTER-1 with the other Category.
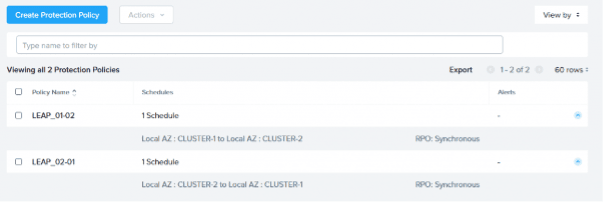
When both protection policies are in place, we can protect virtual machines. Tag a virtual machine with a category. In my case Win10-Test is running on CLUSTER-1 in Storage Container LEAP_01-02 so it will be tagged with category: LEAP:Cluster1-Cluster2.

When protected open Protection Summary (Hamburger Menu --> Data Protection --> Protection Summary) and select CLUSTER1.
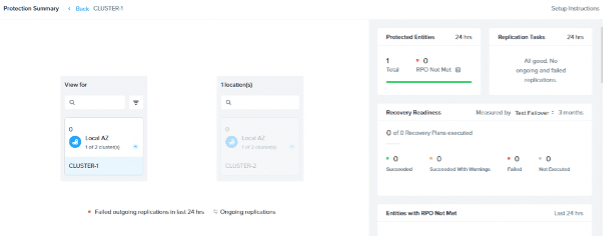
Top right you can see 1 machine is protected. Click on the "1" to see which machine is protected.

In my case: Win10-Test is protected by protection policy LEAP_01-02 configured by Category LEAP:Cluster1-Cluster2. And status is Synced.

Now we need to create Recovery Plans. With this we tell the clusters when (planned/unplanned) a failover should be done and how (manual/automatic).

Click on the hamburger menu --> Data Protection --> Recovery Plans --> Create a new Recovery Plan.
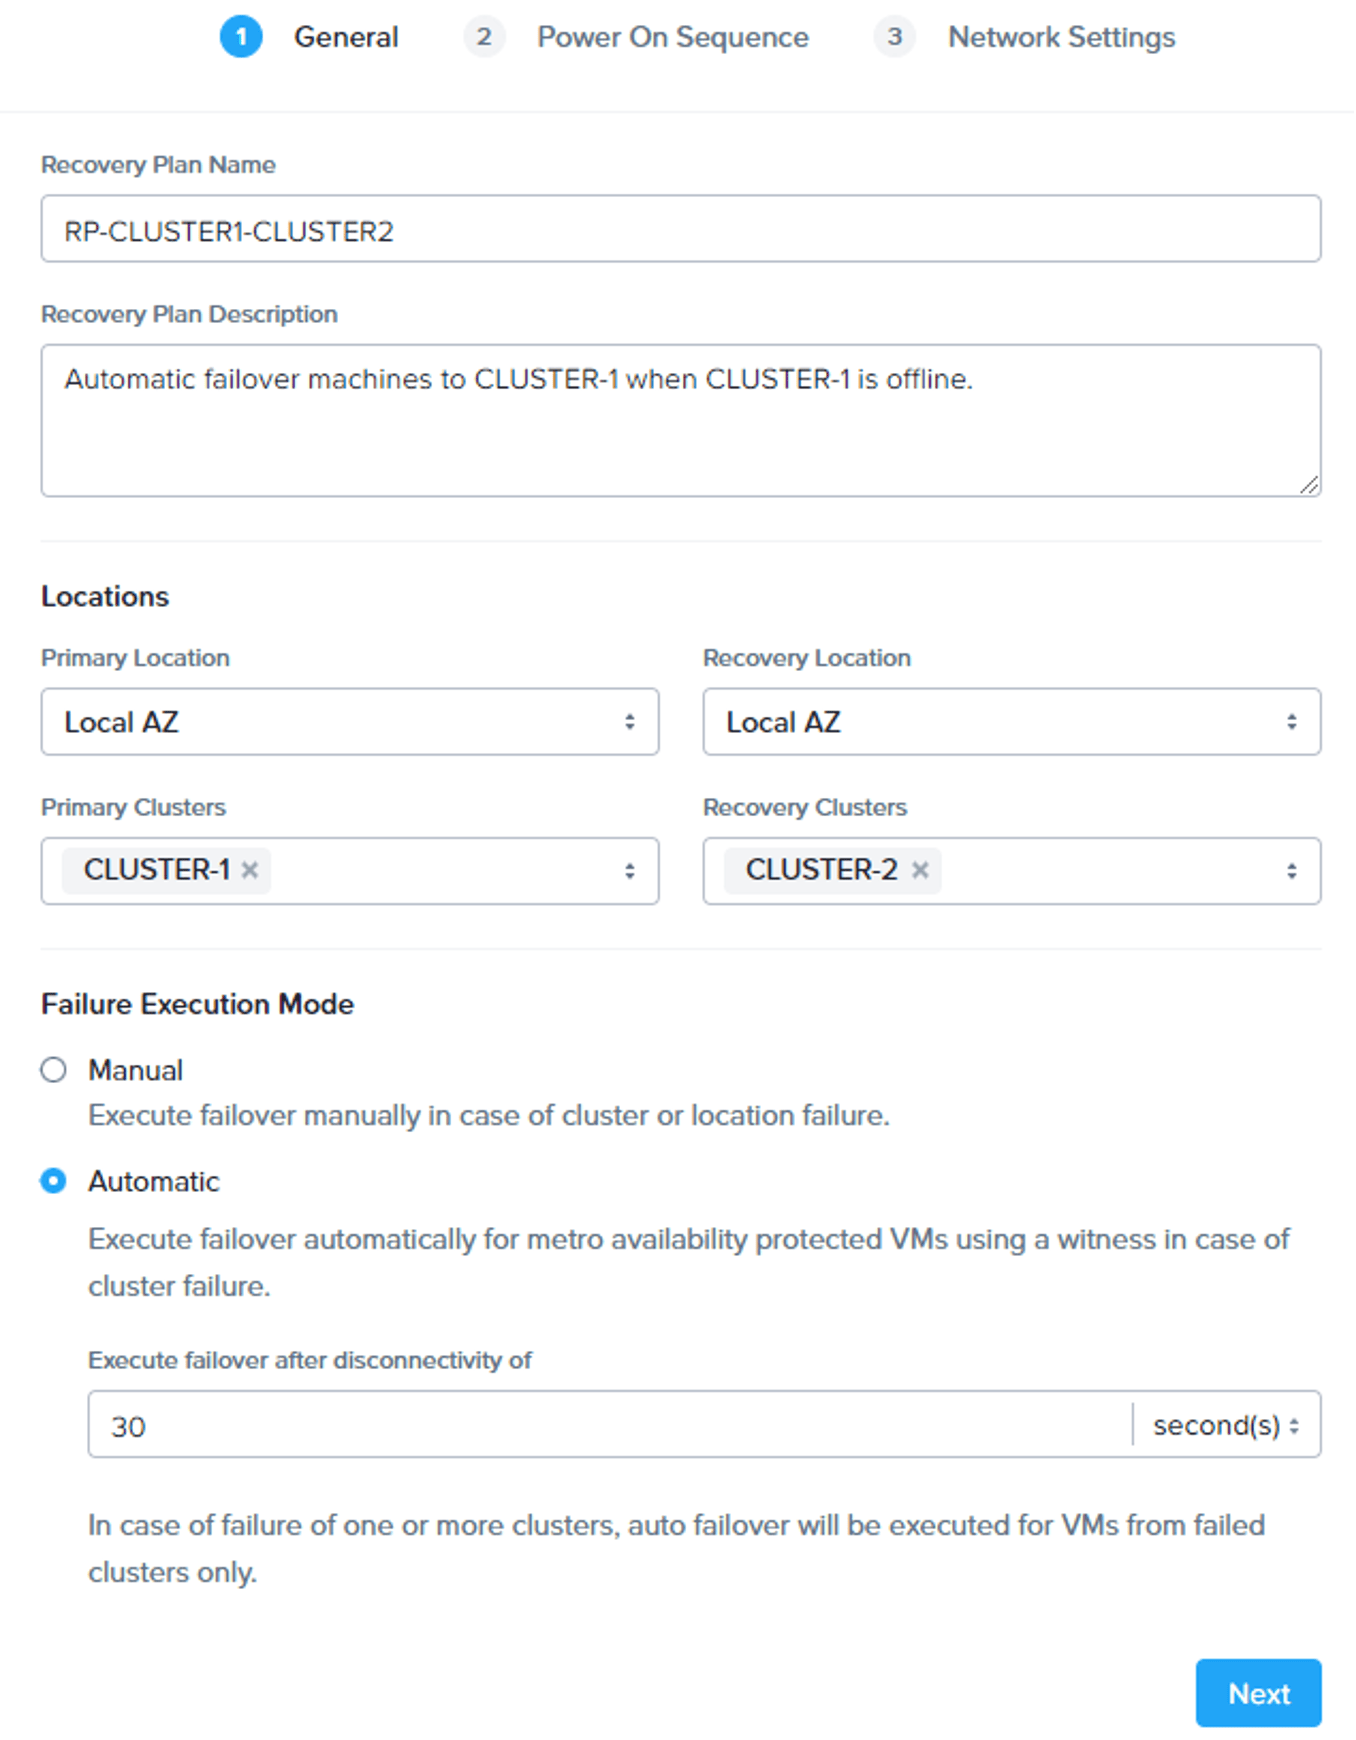
I want to automatic failover protected machines from CLUSTER-1 to CLUSTER-2 after 30 seconds of disconnectivity.
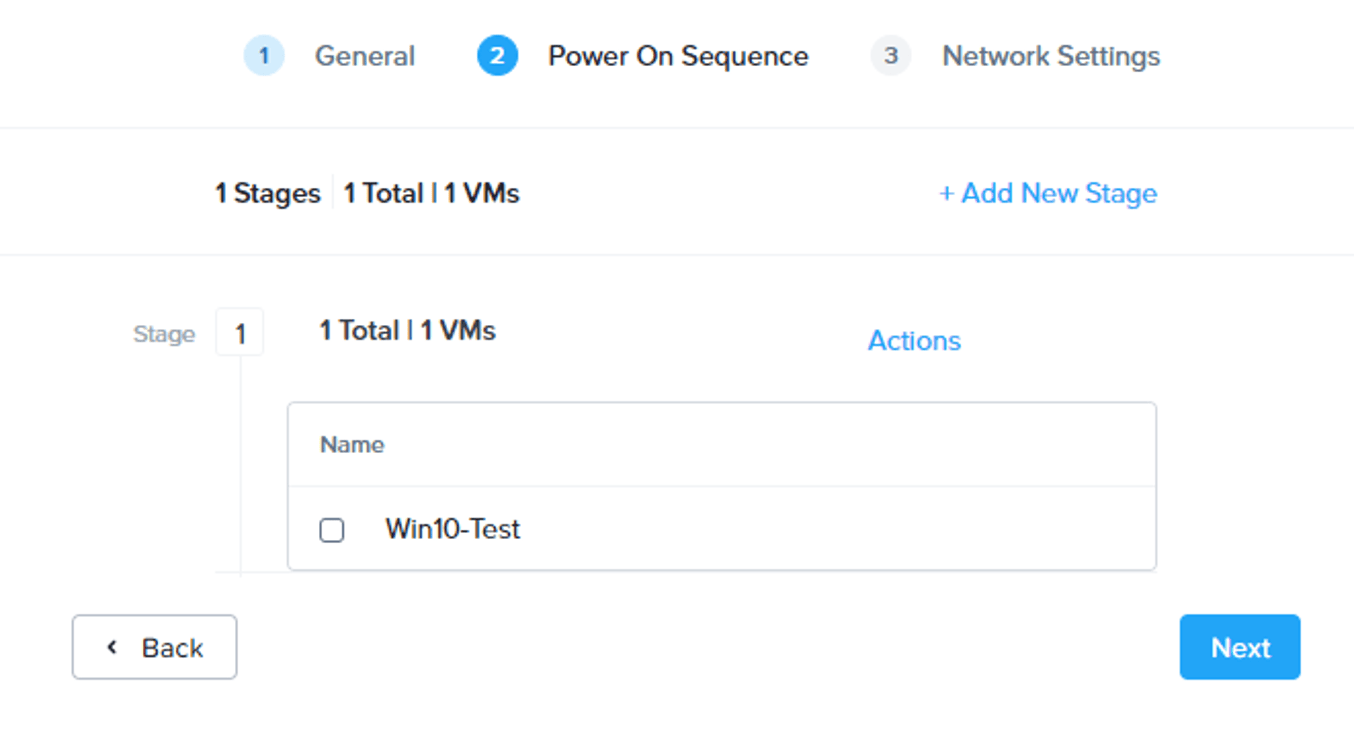
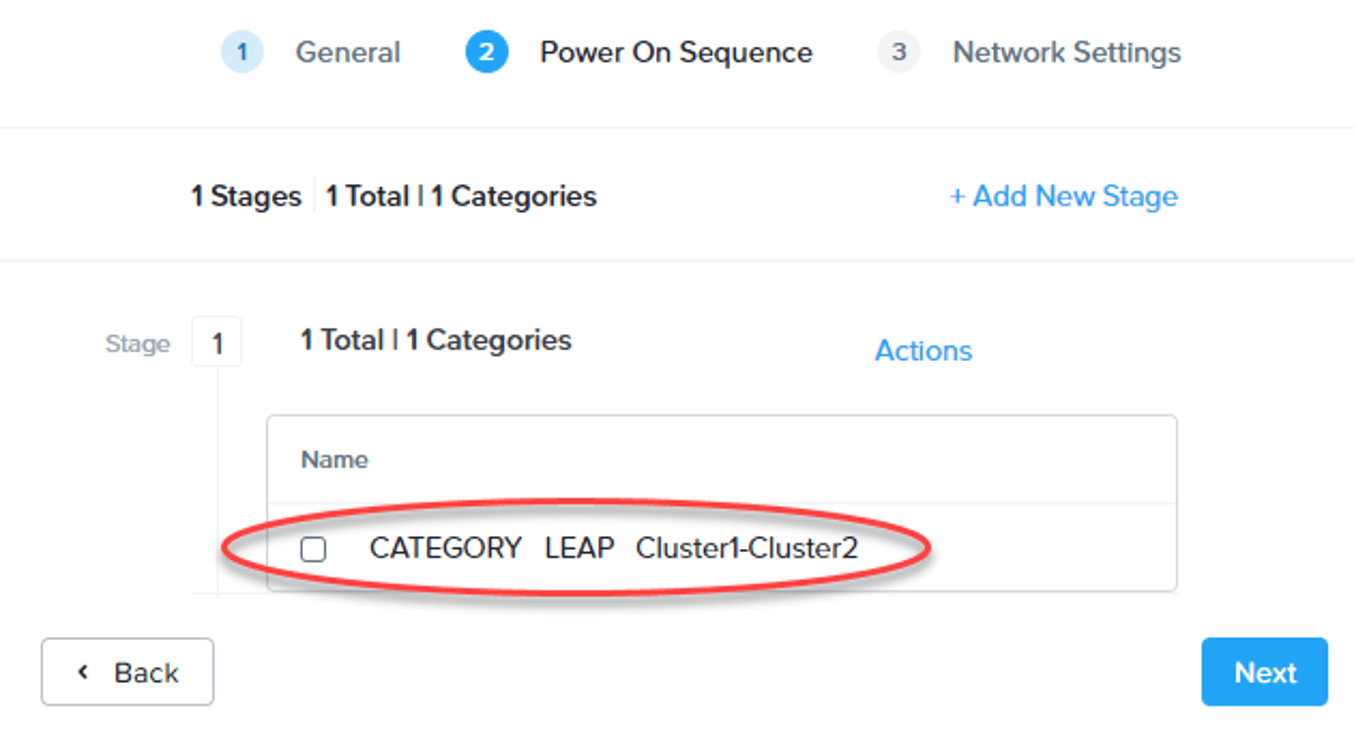
For the power on sequence, you can make batches for virtual machines. For example, when a sql server needs to boot first you can add the sql server in stage 1 and the other servers in stage 2. In my case I just add Win10-Test in stage 1.
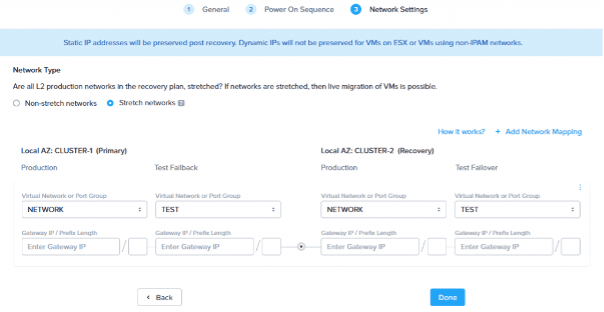
If your networks are in a stretched Layer2 network you can do live migrations. In my case they are so I select the Stretch networks radio button and make my mappings for the networks. Best practice is to have a separate TEST network if you want to do test migrations. Make sure you create another Recovery Plan for Cluster-2 to Cluster-1

Letā€™s try to live migrate (planned failover) this machine to the other cluster. Select the Recovery Plan and chose Failover.
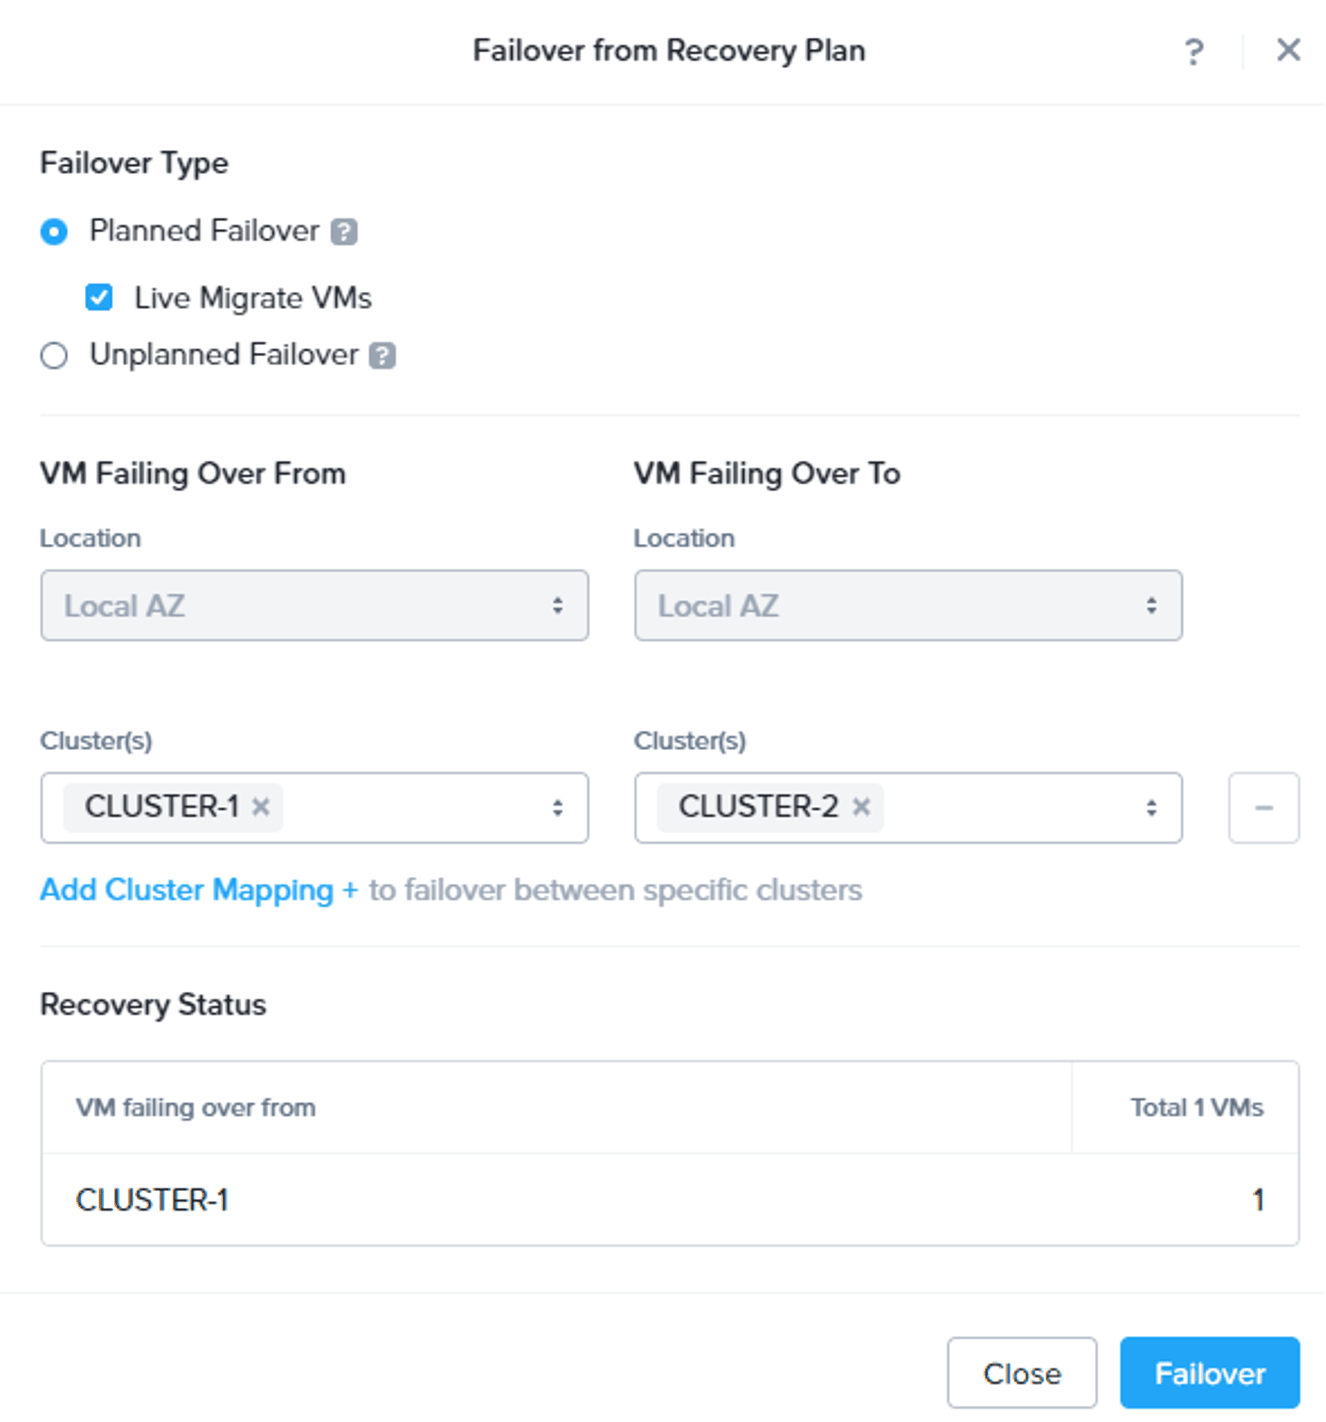
Select Planned Failover and Live Migrate VMs. Make the correct from-to selection and click: Failover.
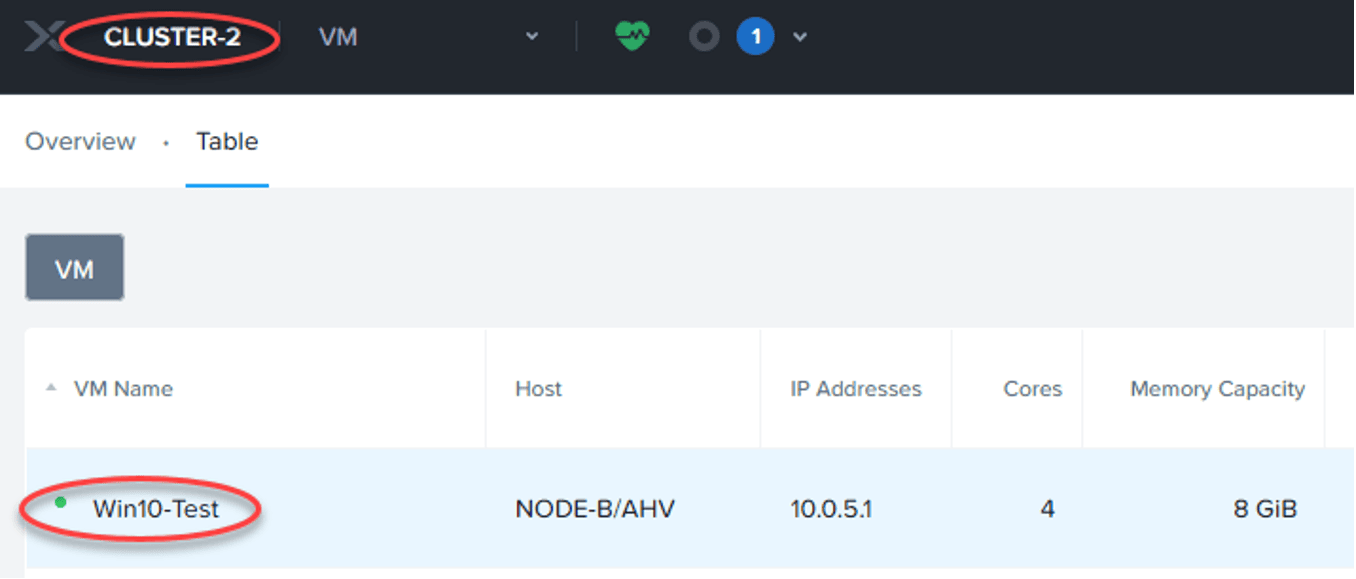
And after a couple of seconds my machine is running smoothly on the other side without any downtime.

When all is working fine, and new virtual machines are created you need to add those machines to the category and also to the Recovery Plans. Off course we want to do this automatically.

Automatic add to a Recovery Plan is easy. Just update the Recovery Plans and change the entity from VM to a category.
To automatic categorize new virtual machines we need to create a playbook. Copy and paste this line of text into a file with extension .pbk

{"pcVersion":"6.1","pcUuid":"af6422f5-f0b7-492e-acaf-8df2fba30346","hashValue":"Yp5prqabXNCNU3wbyCEj3ErbrAjZztyZYhf1ICsfKG8=","actionRuleList":i{"uuid":"07997214-63f7-457f-9d51-13034bfd677f","name":"Automatic Categorize New Virtual Machines","isEnabled":true,"validated":true,"executionUserName":"admin","executionUserUuid":"00000000-0000-0000-0000-000000000000","triggerList":i{"uuid":"3b11cd98-8392-4817-8740-db19561571a7","triggerType":{"type":"trigger_type","uuid":"","name":"event_trigger"},"displayName":"Event","inputParameterList":i{"name":"operation_type","value":"1"},{"name":"category_filter_list","value":"u]"},{"name":"type","value":"VmCreateAudit"},{"name":"source_entity_info_list","value":"u]"}]}],"actionList":i{"uuid":"456a8ff1-485c-4d21-b61b-488f6367787c","actionType":{"type":"action_type","uuid":"","name":"wait_for_duration"},"displayName":"Wait for Some Time","inputParameterList":i{"name":"block_resume","value":"false"},{"name":"post_check_trigger_validity","value":"false"},{"name":"stop_after_time","value":"false"},{"name":"wait_duration","value":"1"}],"maxRetries":2,"postCheckTriggerValidity":false,"childActionUuids":i"69f1830b-a598-42d5-aafb-b28402652cf2"]},{"uuid":"69f1830b-a598-42d5-aafb-b28402652cf2","actionType":{"type":"action_type","uuid":"","name":"vm_lookup_action"},"displayName":"Lookup VM Details","inputParameterList":i{"name":"target_vm","value":"{{triggeri0].source_entity_info}}"}],"maxRetries":2,"childActionUuids":i"174190ab-89e9-4031-bd90-a13365b0f7b5"]},{"uuid":"174190ab-89e9-4031-bd90-a13365b0f7b5","actionType":{"type":"action_type","uuid":"","name":"branch_action"},"displayName":"Branch","inputParameterList":i{"name":"values","value":"u\"{{actionc1].hosting_cluster_vip}}\",\"10.0.1.30\",\"{{actionc1].hosting_cluster_vip}}\",\"10.0.3.30\"]"},{"name":"condition","value":"u\"if\",\"if\"]"},{"name":"branch","value":"u\"1a2d4d83-c70c-4e55-8044-2b392fa50cb8\",\"5c368617-7b64-45fc-92f3-67bdf4b92ed8\"]"},{"name":"conditional_expression","value":"u\"{0}=={1}\",\"{2}=={3}\"]"}],"maxRetries":2,"description":"@|","childActionUuids":i"1a2d4d83-c70c-4e55-8044-2b392fa50cb8","5c368617-7b64-45fc-92f3-67bdf4b92ed8"]},{"uuid":"1a2d4d83-c70c-4e55-8044-2b392fa50cb8","actionType":{"type":"action_type","uuid":"","name":"add_category_action"},"displayName":"Add to Category","inputParameterList":i{"name":"target_vm","value":"{{triggeri0].source_entity_info}}"},{"name":"category_entity_info","value":"u]"},{"name":"entity_type","value":"vm"}],"maxRetries":2},{"uuid":"5c368617-7b64-45fc-92f3-67bdf4b92ed8","actionType":{"type":"action_type","uuid":"","name":"add_category_action"},"displayName":"Add to Category","inputParameterList":i{"name":"target_vm","value":"{{triggeri0].source_entity_info}}"},{"name":"category_entity_info","value":"u]"},{"name":"entity_type","value":"vm"}],"maxRetries":2,"description":"Copy 1"}],"lastUpdateUser":"admin","isPrepackaged":false,"checkTriggerValidity":true,"description":"Automatic Categorize New Virtual Machines Based On Cluster IP","triggerFilterableInputParamName":"type","triggerFilterableInputParamValue":"VmCreateAudit","ruleType":"kXPlay"}]}

Now import this file into playbook. Click on the Hamburger Menu --> Operations --> Playbooks --> Import.

When the playbook is imported you need to change it to match you cluster ip's (Under: Branches) and categories (Under: add to Category). Enable the playbook and all new virtual machines will automatic be added to the correct protection policy and recovery plan.

This is a guest post from Nutanix Technology Champion Jeroen Tielen, Nutanix Trainer and Citrix Guru.


Ā©ļø 2022 Nutanix, Inc. All rights reserved. Nutanix, the Nutanix logo and all Nutanix product, feature and service names mentioned herein are registered trademarks or trademarks of Nutanix, Inc. in the United States and other countries. Other brand names mentioned herein are for identification purposes only and may be the trademarks of their respective holder(s). This post may contain links to external websites that are not part of Nutanix.com. Nutanix does not control these sites and disclaims all responsibility for the content or accuracy of any external site. Our decision to link to an external site should not be considered an endorsement of any content on such a site. Certain information contained in this post may relate to or be based on studies, publications, surveys and other data obtained from third-party sources and our own internal estimates and research. While we believe these third-party studies, publications, surveys and other data are reliable as of the date of this post, they have not independently verified, and we make no representation as to the adequacy, fairness, accuracy, or completeness of any information obtained from third-party sources.

This post may contain express and implied forward-looking statements, which are not historical facts and are instead based on our current expectations, estimates and beliefs. The accuracy of such statements involves risks and uncertainties and depends upon future events, including those that may be beyond our control, and actual results may differ materially and adversely from those anticipated or implied by such statements. Any forward-looking statements included herein speak only as of the date hereof and, except as required by law, we assume no obligation to update or otherwise revise any of such forward-looking statements to reflect subsequent events or circumstances

Good stuff Jeroen! Dutch Nutanix User Group representing in style!


better learig from that site


On my previous blog (Link) I showed you how to build a metro availability. Now I want to "upgrade" both clusters to AHV and enable data protection with the help of Leap to achieve an RPO of zero (0).

This blog post are two posts combined. First is the in-place conversion of ESX to AHV and the second is how to enable and configure Leap.

Conversion

Before we can change the hypervisor to AHV there are a couple of requirements/things to remember:

  • NGT tools must be installed in each VM: This makes sure we can boot the guest vm's after conversion.
  • Each host must have a uplink NIC team.
  • LACP based load balancing is not supported: So make sure this is turned off on the dSwitch (and on the physical switch).
  • HA and DRS should be enabled;
  • DR activities will be paused during conversion.

As my setup is not changed/optimized, I need to change some settings. My vSwitch0 has the following configuration:

This will give the following error: "external vswitch vSwitch0 does not have homogeneous uplinks" during validation. As there are 4 nics connected to the vSwitch (vmnic0 and 1 are 1Gbps nics) I need to remove the NICs which are not in use.

Next step is to disable admission control in the VMware cluster:

And I need to delete metro availability. (Yes delete, so make sure all machines are running on the correct nodes and storage containers.

When all is in place, we can do the conversion. We start with CLUSTER-2 as my vCenter is running on CLUSTER-1. In Prism Element go to Settings --> Convert Cluster. Click on: Validate and provide vCenter credentials. (What is validating doing? Link). When all is correct click on the convert button. The following box will be shown:

This is an important one. As typed above, my vCenter is currently running on CLUSTER-1 and for now I'm good šŸ˜‰ Just click Yes.

The nodes are being reimaged to AHV one at the time. And the steps are:

Imaging node -> Rebooting into installer -> Starting host installer, Will run CVM Installer in a while -> Running CVM Installer, Starting host installer -> Installing AHV, Running CVM Installer -> Running CVM Installer -> Rebooting node. This may take several minutes -> All operations completed successfully. Goto start ;)Ā 

One host done, three to go. In my case 1 host took 30 minutes.

Next, I will convert my other cluster. But vCenter is running on it so this is not supported.Ā In case you are running into the same issues, first migrate vCenter to a temporary ESX server before proceeding this conversion.

When done I did some cleaning: Deleted the METRO Storage Containers which are from the other sites. Deleted the remotes sites under data protection and deleted vCenter and vCLS VMS ;)

Enable and Configure Leap

Because the METRO Storage Containers are deleted make sure they are recreated again to match the name from the other cluster. (I've renamed them to LEAP_01-02 and LEAP_02-01).

In Prism Central (my both clusters are connected to the same Prism Central) click on Prism Central Settings --> Enable Leap. Make sure the requirements are met and click on "Enable". If you are using different Prism Central instances, make sure a witness vm is deployed and configured and Availability zones are configured. (See previous blog for this).

When Leap is enabled, we need to create a category. When machines are tagged with this category they will be protected. Click on the hamburger menu and select Administration --> Categories --> Create Category.

Create the category as described above. We tag machines in CLUSTER-1 with the Leap: Cluster1-Cluster2 tag and vice versa.

It is time to create Protection Policies. Click on the hamburger menu and select Data Protection --> Protection Policies --> Create Protection Policy.

Create a policy as showed in the screenshot. You can choose between asynchronous or synchronous. We want a RPO of zero (0) so synchronous is the method. More information here:Ā Link. Click Next for the entities screen.

Here we select the LEAP:Cluster1-Cluster2 category and click add and create. Now create a second protection policy for CLUSTER-2 to CLUSTER-1 with the other Category.

When both protection policies are in place, we can protect virtual machines. Tag a virtual machine with a category. In my case Win10-Test is running on CLUSTER-1 in Storage Container LEAP_01-02 so it will be tagged with category: LEAP:Cluster1-Cluster2.

When protected open Protection Summary (Hamburger Menu --> Data Protection --> Protection Summary) and select CLUSTER1.

Top right you can see 1 machine is protected. Click on the "1" to see which machine is protected.

In my case: Win10-Test is protected by protection policy LEAP_01-02 configured by Category LEAP:Cluster1-Cluster2. And status is Synced.

Now we need to create Recovery Plans. With this we tell the clusters when (planned/unplanned) a failover should be done and how (manual/automatic).

Click on the hamburger menu --> Data Protection --> Recovery Plans --> Create a new Recovery Plan.

I want to automatic failover protected machines from CLUSTER-1 to CLUSTER-2 after 30 seconds of disconnectivity.

For the power on sequence, you can make batches for virtual machines. For example, when a sql server needs to boot first you can add the sql server in stage 1 and the other servers in stage 2. In my case I just add Win10-Test in stage 1.

If your networks are in a stretched Layer2 network you can do live migrations. In my case they are so I select the Stretch networks radio button and make my mappings for the networks. Best practice is to have a separate TEST network if you want to do test migrations. Make sure you create another Recovery Plan for Cluster-2 to Cluster-1

Letā€™s try to live migrate (planned failover) this machine to the other cluster. Select the Recovery Plan and chose Failover.

Select Planned Failover and Live Migrate VMs. Make the correct from-to selection and click: Failover.

And after a couple of seconds my machine is running smoothly on the other side without any downtime.

When all is working fine, and new virtual machines are created you need to add those machines to the category and also to the Recovery Plans. Off course we want to do this automatically.

Automatic add to a Recovery Plan is easy. Just update the Recovery Plans and change the entity from VM to a category.

To automatic categorize new virtual machines we need to create a playbook. Copy and paste this line of text into a file with extension .pbk

{"pcVersion":"6.1","pcUuid":"af6422f5-f0b7-492e-acaf-8df2fba30346","hashValue":"Yp5prqabXNCNU3wbyCEj3ErbrAjZztyZYhf1ICsfKG8=","actionRuleList":l{"uuid":"07997214-63f7-457f-9d51-13034bfd677f","name":"Automatic Categorize New Virtual Machines","isEnabled":true,"validated":true,"executionUserName":"admin","executionUserUuid":"00000000-0000-0000-0000-000000000000","triggerList":e{"uuid":"3b11cd98-8392-4817-8740-db19561571a7","triggerType":{"type":"trigger_type","uuid":"","name":"event_trigger"},"displayName":"Event","inputParameterList":e{"name":"operation_type","value":"1"},{"name":"category_filter_list","value":"v]"},{"name":"type","value":"VmCreateAudit"},{"name":"source_entity_info_list","value":"v]"}]}],"actionList":o{"uuid":"456a8ff1-485c-4d21-b61b-488f6367787c","actionType":{"type":"action_type","uuid":"","name":"wait_for_duration"},"displayName":"Wait for Some Time","inputParameterList":e{"name":"block_resume","value":"false"},{"name":"post_check_trigger_validity","value":"false"},{"name":"stop_after_time","value":"false"},{"name":"wait_duration","value":"1"}],"maxRetries":2,"postCheckTriggerValidity":false,"childActionUuids":n"69f1830b-a598-42d5-aafb-b28402652cf2"]},{"uuid":"69f1830b-a598-42d5-aafb-b28402652cf2","actionType":{"type":"action_type","uuid":"","name":"vm_lookup_action"},"displayName":"Lookup VM Details","inputParameterList":e{"name":"target_vm","value":"{{trigger{0].source_entity_info}}"}],"maxRetries":2,"childActionUuids":n"174190ab-89e9-4031-bd90-a13365b0f7b5"]},{"uuid":"174190ab-89e9-4031-bd90-a13365b0f7b5","actionType":{"type":"action_type","uuid":"","name":"branch_action"},"displayName":"Branch","inputParameterList":e{"name":"values","value":"v\"{{action{1].hosting_cluster_vip}}\",\"10.0.1.30\",\"{{action{1].hosting_cluster_vip}}\",\"10.0.3.30\"]"},{"name":"condition","value":"v\"if\",\"if\"]"},{"name":"branch","value":"v\"1a2d4d83-c70c-4e55-8044-2b392fa50cb8\",\"5c368617-7b64-45fc-92f3-67bdf4b92ed8\"]"},{"name":"conditional_expression","value":"v\"{0}=={1}\",\"{2}=={3}\"]"}],"maxRetries":2,"description":"@|","childActionUuids":n"1a2d4d83-c70c-4e55-8044-2b392fa50cb8","5c368617-7b64-45fc-92f3-67bdf4b92ed8"]},{"uuid":"1a2d4d83-c70c-4e55-8044-2b392fa50cb8","actionType":{"type":"action_type","uuid":"","name":"add_category_action"},"displayName":"Add to Category","inputParameterList":e{"name":"target_vm","value":"{{trigger{0].source_entity_info}}"},{"name":"category_entity_info","value":"v]"},{"name":"entity_type","value":"vm"}],"maxRetries":2},{"uuid":"5c368617-7b64-45fc-92f3-67bdf4b92ed8","actionType":{"type":"action_type","uuid":"","name":"add_category_action"},"displayName":"Add to Category","inputParameterList":e{"name":"target_vm","value":"{{trigger{0].source_entity_info}}"},{"name":"category_entity_info","value":"v]"},{"name":"entity_type","value":"vm"}],"maxRetries":2,"description":"Copy 1"}],"lastUpdateUser":"admin","isPrepackaged":false,"checkTriggerValidity":true,"description":"Automatic Categorize New Virtual Machines Based On Cluster IP","triggerFilterableInputParamName":"type","triggerFilterableInputParamValue":"VmCreateAudit","ruleType":"kXPlay"}]}

Now import this file into playbook. Click on the Hamburger Menu --> Operations --> Playbooks --> Import.

When the playbook is imported you need to change it to match you cluster ip's (Under: Branches) and categories (Under: add to Category). Enable the playbook and all new virtual machines will automatic be added to the correct protection policy and recovery plan.

This is a guest post from Nutanix Technology Champion Jeroen Tielen, Nutanix Trainer and Citrix Guru.

Ā©ļøļø 2022 Nutanix, Inc. All rights reserved. Nutanix, the Nutanix logo and all Nutanix product, feature and service names mentioned herein are registered trademarks or trademarks of Nutanix, Inc. in the United States and other countries. Other brand names mentioned herein are for identification purposes only and may be the trademarks of their respective holder(s). This post may contain links to external websites that are not part of Nutanix.com. Nutanix does not control these sites and disclaims all responsibility for the content or accuracy of any external site. Our decision to link to an external site should not be considered an endorsement of any content on such a site. Certain information contained in this post may relate to or be based on studies, publications, surveys and other data obtained from third-party sources and our own internal estimates and research. While we believe these third-party studies, publications, surveys and other data are reliable as of the date of this post, they have not independently verified, and we make no representation as to the adequacy, fairness, accuracy, or completeness of any information obtained from third-party sources.

This post may contain express and implied forward-looking statements, which are not historical facts and are instead based on our current expectations, estimates and beliefs. The accuracy of such statements involves risks and uncertainties and depends upon future events, including those that may be beyond our control, and actual results may differ materially and adversely from those anticipated or implied by such statements. Any forward-looking statements included herein speak only as of the date hereof and, except as required by law, we assume no obligation to update or otherwise revise any of such forward-looking statements to reflect subsequent events or circumstances

Nice ArticalĀ 


what is the deference between Nutanix leap automation or manual?