


What is a service mesh?
When transitioning from monolithic applications to a distributed microservice architecture the number of services dramatically increases. This decentralisation at scale makes it difficult for developers and operators to enable service-to-service communications.Service meshes enable service-to-service communications providing connectivity, security, control and observability.
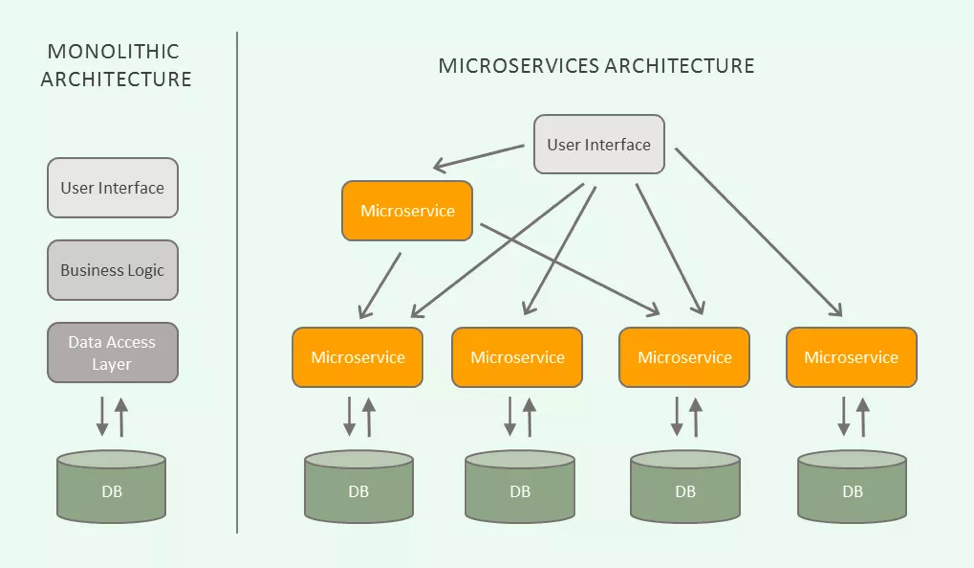
Source: Microtica
What is Istio?
From Istio website:“At a high level, Istio helps reduce the complexity of these deployments, and eases the strain on your development teams. It is a completely open source service mesh that layers transparently onto existing distributed applications. It is also a platform, including APIs that let it integrate into any logging platform, or telemetry or policy system. Istio’s diverse feature set lets you successfully, and efficiently, run a distributed microservice architecture, and provides a uniform way to secure, connect, and monitor microservices.”
Architecture
There are two logical planes in an Istio service mesh: a data plane and a control plane.- The data plane uses Envoy proxies as sidecar containers, one per microservice. The goal of these proxies is to govern the communications between microservices, enforcing policies and collecting telemetry with Mixer.
- The control plane coordinates the proxy configurations and helps with management tasks.

Source: Istio
More info about Istio architecture.
Istio on Nutanix Karbon
This post will help you to deploy a new brand Kubernetes cluster with running Istio on top. Let’s get started!Provision a Nutanix Karbon Cluster
The first thing you’ll need is a Nutanix Karbon Cluster.If you don’t yet have one, please visit Kubernetes Cluster Deployment with Nutanix Karbon by Michael Haigh. For the purpose of this post, we’ll use a development cluster with Kubernetes version 1.13 and default compute resources. Stay tuned for a future blog post where we’ll cover installing Istio on a production Kubernetes cluster.
(Optional) Kubernetes Admission Controller
Nutanix Karbon only uses stable admission controllers. In order to support Istio Automatic Sidecar Injection feature, we’ll need to include two beta admission controllers: MutatingAdmissionWebhook and ValidatingAdmissionWebhook.You’ll need to connect using SSH action in Karbon to your Kubernetes master node.
Run the command to append the two additional admission controllers.
code:
sudo sed -i '/admission-control/ s/$/,MutatingAdmissionWebhook,ValidatingAdmissionWebhook/' /var/nutanix/etc/kubernetes/manifests/kube-apiserver.yaml
Restart the kubelet-master service.
code:
sudo systemctl daemon-reload && sudo systemctl restart kubelet-master
Download Istio
At the time of writing, Istio is at version 1.1.3.code:
curl -L https://git.io/getLatestIstio | ISTIO_VERSION=1.1.3 sh -
cd istio-1.1.3
Configure Helm
If you don’t yet have Helm, please visit one of my previous articles, Tillerless Helm on Nutanix Karbon.With Tillerless Helm installed, let’s start Tiller if you haven’t already.
code:
helm tiller start
(Optional) Metrics Server
Istio uses Kubernetes Horizontal Pod Autoscaler for few of the Istio components. This ensures when your microservices application scales, Istio scales at the same time to meet performance and resiliency requirements.Metrics Server replaces Heapster (deprecated). Istio will pull compute metrics from the metrics-server.
To install the metrics-server with Helm.
code:
helm install stable/metrics-server \
--name metrics-server \
--namespace ntnx-system \
--set args[0]="--kubelet-preferred-address-types=InternalIP",\
args[1]="--kubelet-insecure-tls=true",\
args[2]="--logtostderr"
Get view access to the metrics-server for your Karbon user.
code:
echo '
apiVersion: rbac.authorization.k8s.io/v1
kind: ClusterRole
metadata:
 name: view-metrics
rules:
- apiGroups:
  - metrics.k8s.io
 resources:
  - pods
  - nodes
 verbs:
  - get
  - list
  - watch
---
apiVersion: rbac.authorization.k8s.io/v1
kind: ClusterRoleBinding
metadata:
 name: view-metrics
roleRef:
 apiGroup: rbac.authorization.k8s.io
 kind: ClusterRole
 name: view-metrics
subjects:
 - apiGroup: rbac.authorization.k8s.io
  kind: User
  name: system:anonymous
' | kubectl apply -f -
Install Istio on Karbon
At the time of writing, Helm is at version 2.13.1. We are using this version to install Istio 1.1.3. When using Helm there are two steps to install Istio.- Install the istio-init chart to bootstrap all the Istio’s CRDs:
code:
helm install install/kubernetes/helm/istio-init \
--name istio-init \
--namespace istio-system
- Install the istio chart corresponding to demo profile. There are other profiles available.
code:
helm install install/kubernetes/helm/istio \
--name istio \
--namespace istio-system \
--values install/kubernetes/helm/istio/values-istio-demo.yaml
Verifying the installation
Ensure the corresponding Kubernetes pods are deployed and have a STATUS of Running or Completed.code:
kubectl get pods -n istio-system
Now that we have Istio running, let’s deploy a sample application.
Deploying Bookinfo Application
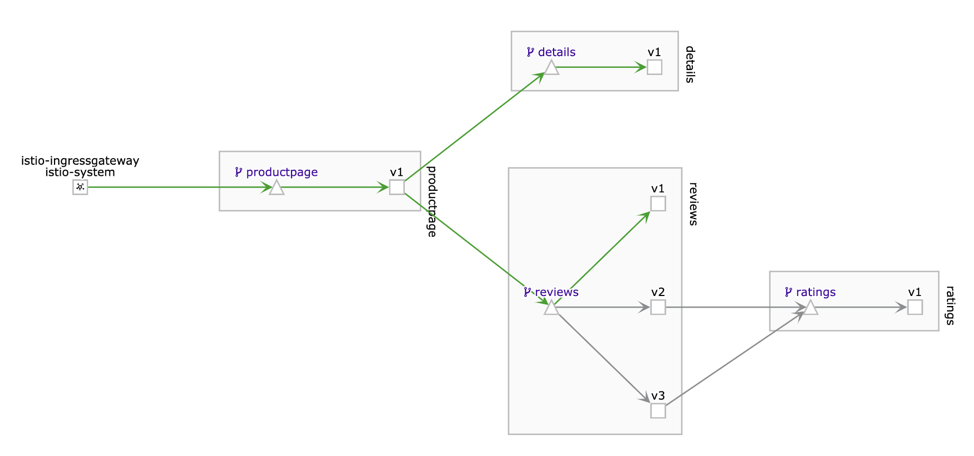
Bookinfo is a microservices application provided by Istio to demonstrate various Istio features.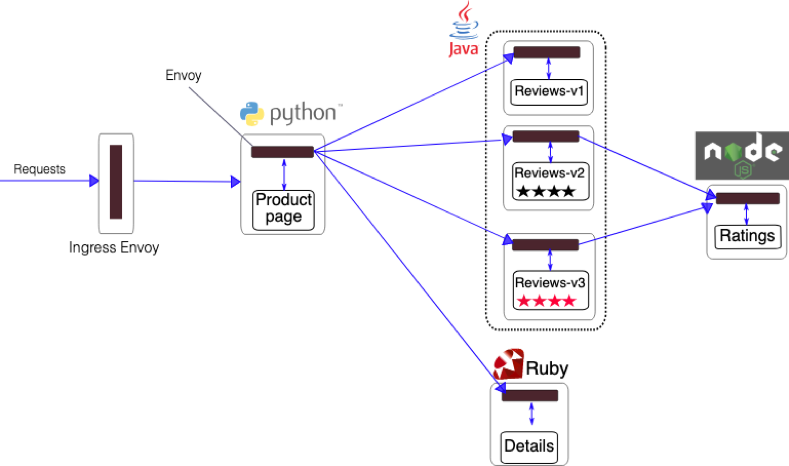
Bookinfo Application (source: Istio)
Install Bookinfo
The application YAML files are part of the Istio release you have downloaded previously. As you can see in the previous diagram, recall that in order for Istio to work it needs to add the Envoy sidecar container to each of the microservices.By default, Istio is not going to inject the sidecars. To make the Istio’s webhook to inject the sidecars we’ll need to enable our namespace using labels. For this example we’ll use the default Kubernetes namespace, which means Istio will inject sidecars into any pod deployed in the default namespace.
code:
kubectl label namespace default istio-injection=enabled
Check if the default namespace has been properly labeled.
code:
kubectl get namespace -L istio-injection
code:
NAME           STATUS   AGE   ISTIO-INJECTION
default        Active   32h   enabled
istio-system   Active   31h
kube-public    Active   32h
kube-system    Active   32h
ntnx-system    Active   32h
Let’s deploy the application. Make sure you are on the root directory of the Istio installation.
code:
kubectl apply -f samples/bookinfo/platform/kube/bookinfo.yaml
The command launches all four services shown in the Bookinfo application architecture diagram. All 3 versions of the reviews service, v1, v2, and v3, are started. Let’s confirm the services have been created, but most importantly the pods are running with two containers, the microservice and the Envoy proxy sidecar.
code:
kubectl get services
code:
NAME          TYPE        CLUSTER-IP       EXTERNAL-IP   PORT(S)    AGE
details       ClusterIP   172.19.189.165           9080/TCP   3s
kubernetes    ClusterIP   172.19.0.1               443/TCP    32h
productpage   ClusterIP   172.19.201.141           9080/TCP   2s
ratings       ClusterIP   172.19.188.70            9080/TCP   3s
reviews       ClusterIP   172.19.236.106           9080/TCP   2s
If you see a single container per pod, make sure you have labeled the namespace and the correct admission controls are configured in the Kubernetes API service.
code:
kubectl get pods
code:
NAME                              READY   STATUS    RESTARTS   AGE
details-v1-69658dcf78-bbrvd       2/2     Running   0          60s
productpage-v1-6b6798cb84-w46vh   2/2     Running   0          59s
ratings-v1-6f97d68b6-nsgbs        2/2     Running   0          59s
reviews-v1-7c98dcd6dc-ph5z8       2/2     Running   0          59s
reviews-v2-6677766d47-xvpfl       2/2     Running   0          59s
reviews-v3-79f9bcc54c-v5c26       2/2     Running   0          59s
Let’s quickly confirm the Bookinfo application is running as expected.
code:
kubectl exec -it $(kubectl get pod -l app=ratings -o jsonpath='{.items[0].metadata.name}') -c ratings -- curl productpage:9080/productpage | grep -o ".*"
The output we are expecting with the previous command is Simple Bookstore App.
Expose Bookinfo
By default the sample Bookinfo application is not exposed for external access. We could use an Ingress Controller like Nginx, but we are going to use the Istio Gateway which uses Envoy proxies.code:
kubectl apply -f samples/bookinfo/networking/bookinfo-gateway.yaml
Before we can visit the website on our browser, we’ll need the IP address of one Kubernetes worker and the external port for Bookinfo app.
code:
export INGRESS_HOST=$(kubectl get po -l istio=ingressgateway \
-n istio-system -o jsonpath='{.items[0].status.hostIP}')
code:
export INGRESS_PORT=$(kubectl -n istio-system get service istio-ingressgateway \
-o jsonpath='{.spec.ports[?(@.name=="http2")].nodePort}')
code:
export GATEWAY_URL=$INGRESS_HOST:$INGRESS_PORT
code:
echo $GATEWAY_URL
Copy the output and in your browser open the page https://about:blank, in my case http://10.10.56.158:31380/productpage.
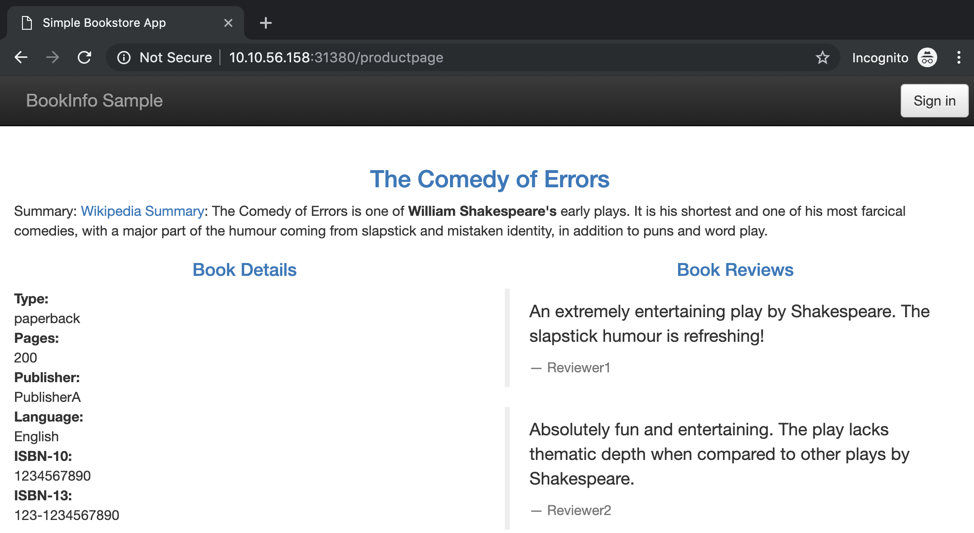
If you refresh the page several times you will see different versions of the Book Reviews. This happens because we haven’t yet applied any routing policy.
Apply default destination rules
Before you can use Istio to control the Bookinfo version routing, you need to define the available versions, called subsets, in destination rules.code:
kubectl apply -f samples/bookinfo/networking/destination-rule-all.yaml
For a better understanding of how Istio is managing the traffic when we change the routing policies, we’ll use two operation tools: Grafana and Kiali.
- Grafana is used to visualise the metrics collected by Prometheus.
- Kiali is used to visualise our service mesh and what paths the requests are taking.
Generate traffic
We’ll generate traffic in the background so we don’t need to be refreshing the page all the time. Make sure to run the command in the terminal where you exported the GATEWAY_URL environment variable.code:
watch -n 1 curl -o /dev/null -s -w %{http_code} $GATEWAY_URL/productpage \
&>/dev/null &
Launch Grafana
Open the Istio Dashboard via the Grafana UI.code:
kubectl -n istio-system port-forward $(kubectl -n istio-system get pod \
-l app=grafana -o jsonpath='{.items[0].metadata.name}') 3000:3000 &>/dev/null &
Visit http://localhost:3000/dashboard/db/istio-mesh-dashboard in your web browser.
The Istio dashboard will look similar to:

Launch Kiali
To open the Kiali UI, execute the following command in your Kubernetes environment:code:
kubectl -n istio-system port-forward $(kubectl -n istio-system get pod \
-l app=kiali -o jsonpath='{.items[0].metadata.name}') 20001:20001 &>/dev/null &
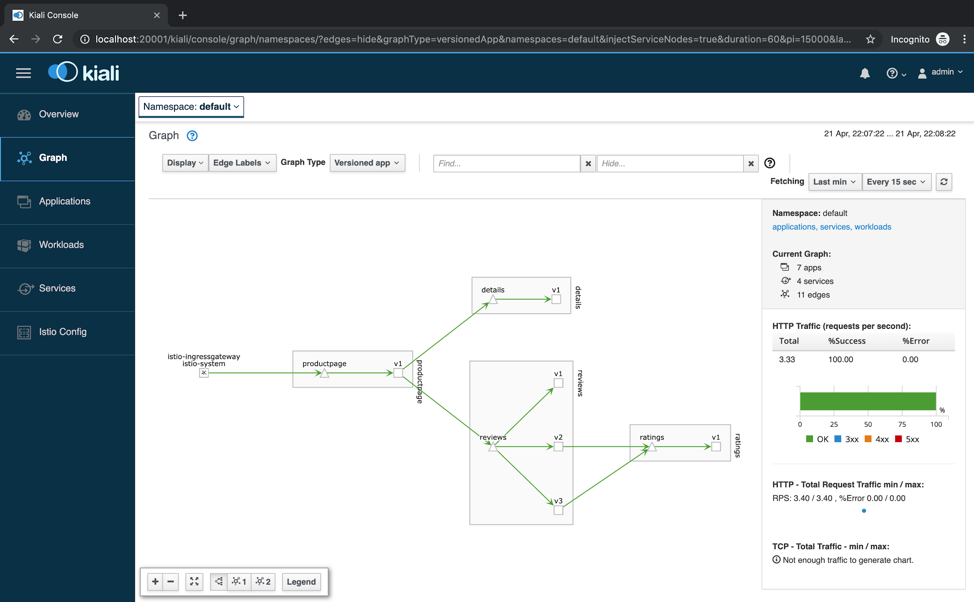
Visit http://localhost:20001/kiali/console in your web browser. Click Graph and make sure to have selected the default namespace.
Operating Istio
There are many Istio tasks you could try by yourself, but for the purpose of this post we’ll focus on Configuring Request Routing. If you want to check the other tasks, visit this link.Current state
As you can see in Kiali, the requests we are sending in the background are getting round robin responses for the reviews service. This means there will be responses with no rating, others with black rating, and others with red rating. This is because we haven’t yet configured any routing policy.In Grafana you will see evenly requests sent to the reviews service. In my case 0.29 ops for each version of the microservice.
Configuring Request Routing
Now we are going to apply different routing policies.- All traffic to v1 of reviews service.
- All traffic to v1 of reviews service except traffic for the user Jason which goes to v2 of reviews service.
Case 1
The following routing policy is going to send all the requests to reviews:v1.code:
kubectl apply -f samples/bookinfo/networking/virtual-service-all-v1.yaml
Wait for a minute and revisit Grafana and Kiali. In Grafana you will see that reviews:v2 and reviews:v3 don’t get any request, as well as ratings:v1.
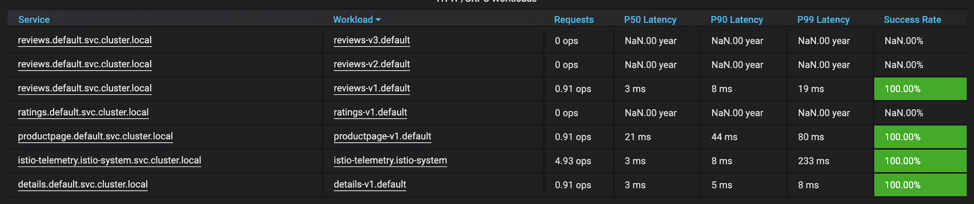
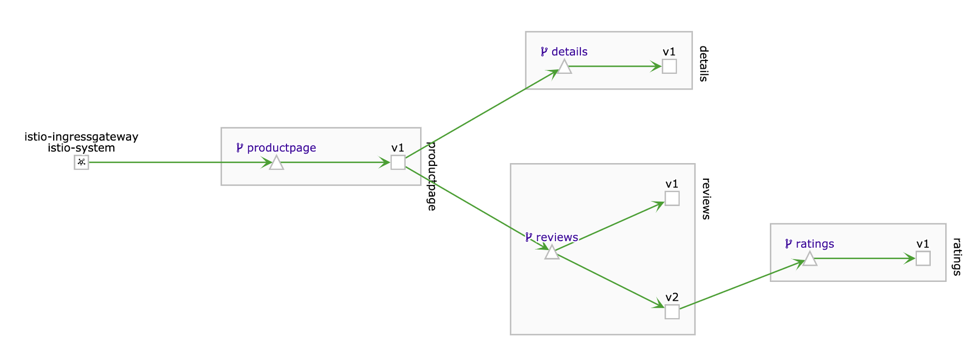
In Kiali you’ll see the inactive links for reviews:v2 and reviews:v3. Only reviews:v1 is on green what means the active link with requests.
Case 2
Next, you will change the route configuration so that all traffic from a specific user is routed to a specific service version. In this case, all traffic from a user named Jason will be routed to the service reviews:v2.Remember, reviews:v2 is the version that includes the star ratings feature.
code:
kubectl apply -f samples/bookinfo/networking/virtual-service-reviews-test-v2.yaml
For this example we need to sign in as Jason in the Bookinfo application. Open your browser and visit https://about:blank. Refresh a few times the page and you will see no rating is shown.
Log in as user jason, refresh the browser, and you’ll see the star ratings appear next to each review.

Refresh the browser continuously for at least 15 seconds and check Grafana and Kiali. In Grafana you will see the new reviews:v2 workload, and the ratings:v1 service.

In Kiali you can see the service mesh has changed and we have the reviews:v1 and the new reviews:v2 with ratings:v1 because the requests from the user jason.
Note: Remember to stop the tasks you have running in the background with killall kubectl and killall watch.
This post is a simple illustration of how easily Istio can be setup on Kubernetes clusters provisioned by Nutanix Karbon.